

Research Preview: The approval workflows feature is set as Research Preview and is under active development. Functionality and results may evolve as we continue to improve the feature. Review and validate outputs before use, and avoid using these features in production or business-critical workflows.
Requires portal admin rights.
Qodo cannot automatically approve a pull request if its review was skipped. Qodo may skip reviewing very small changes. Since an incomplete review cannot be approved, use a pull request that receives a complete review when testing workflows.
Create and configure a workflow
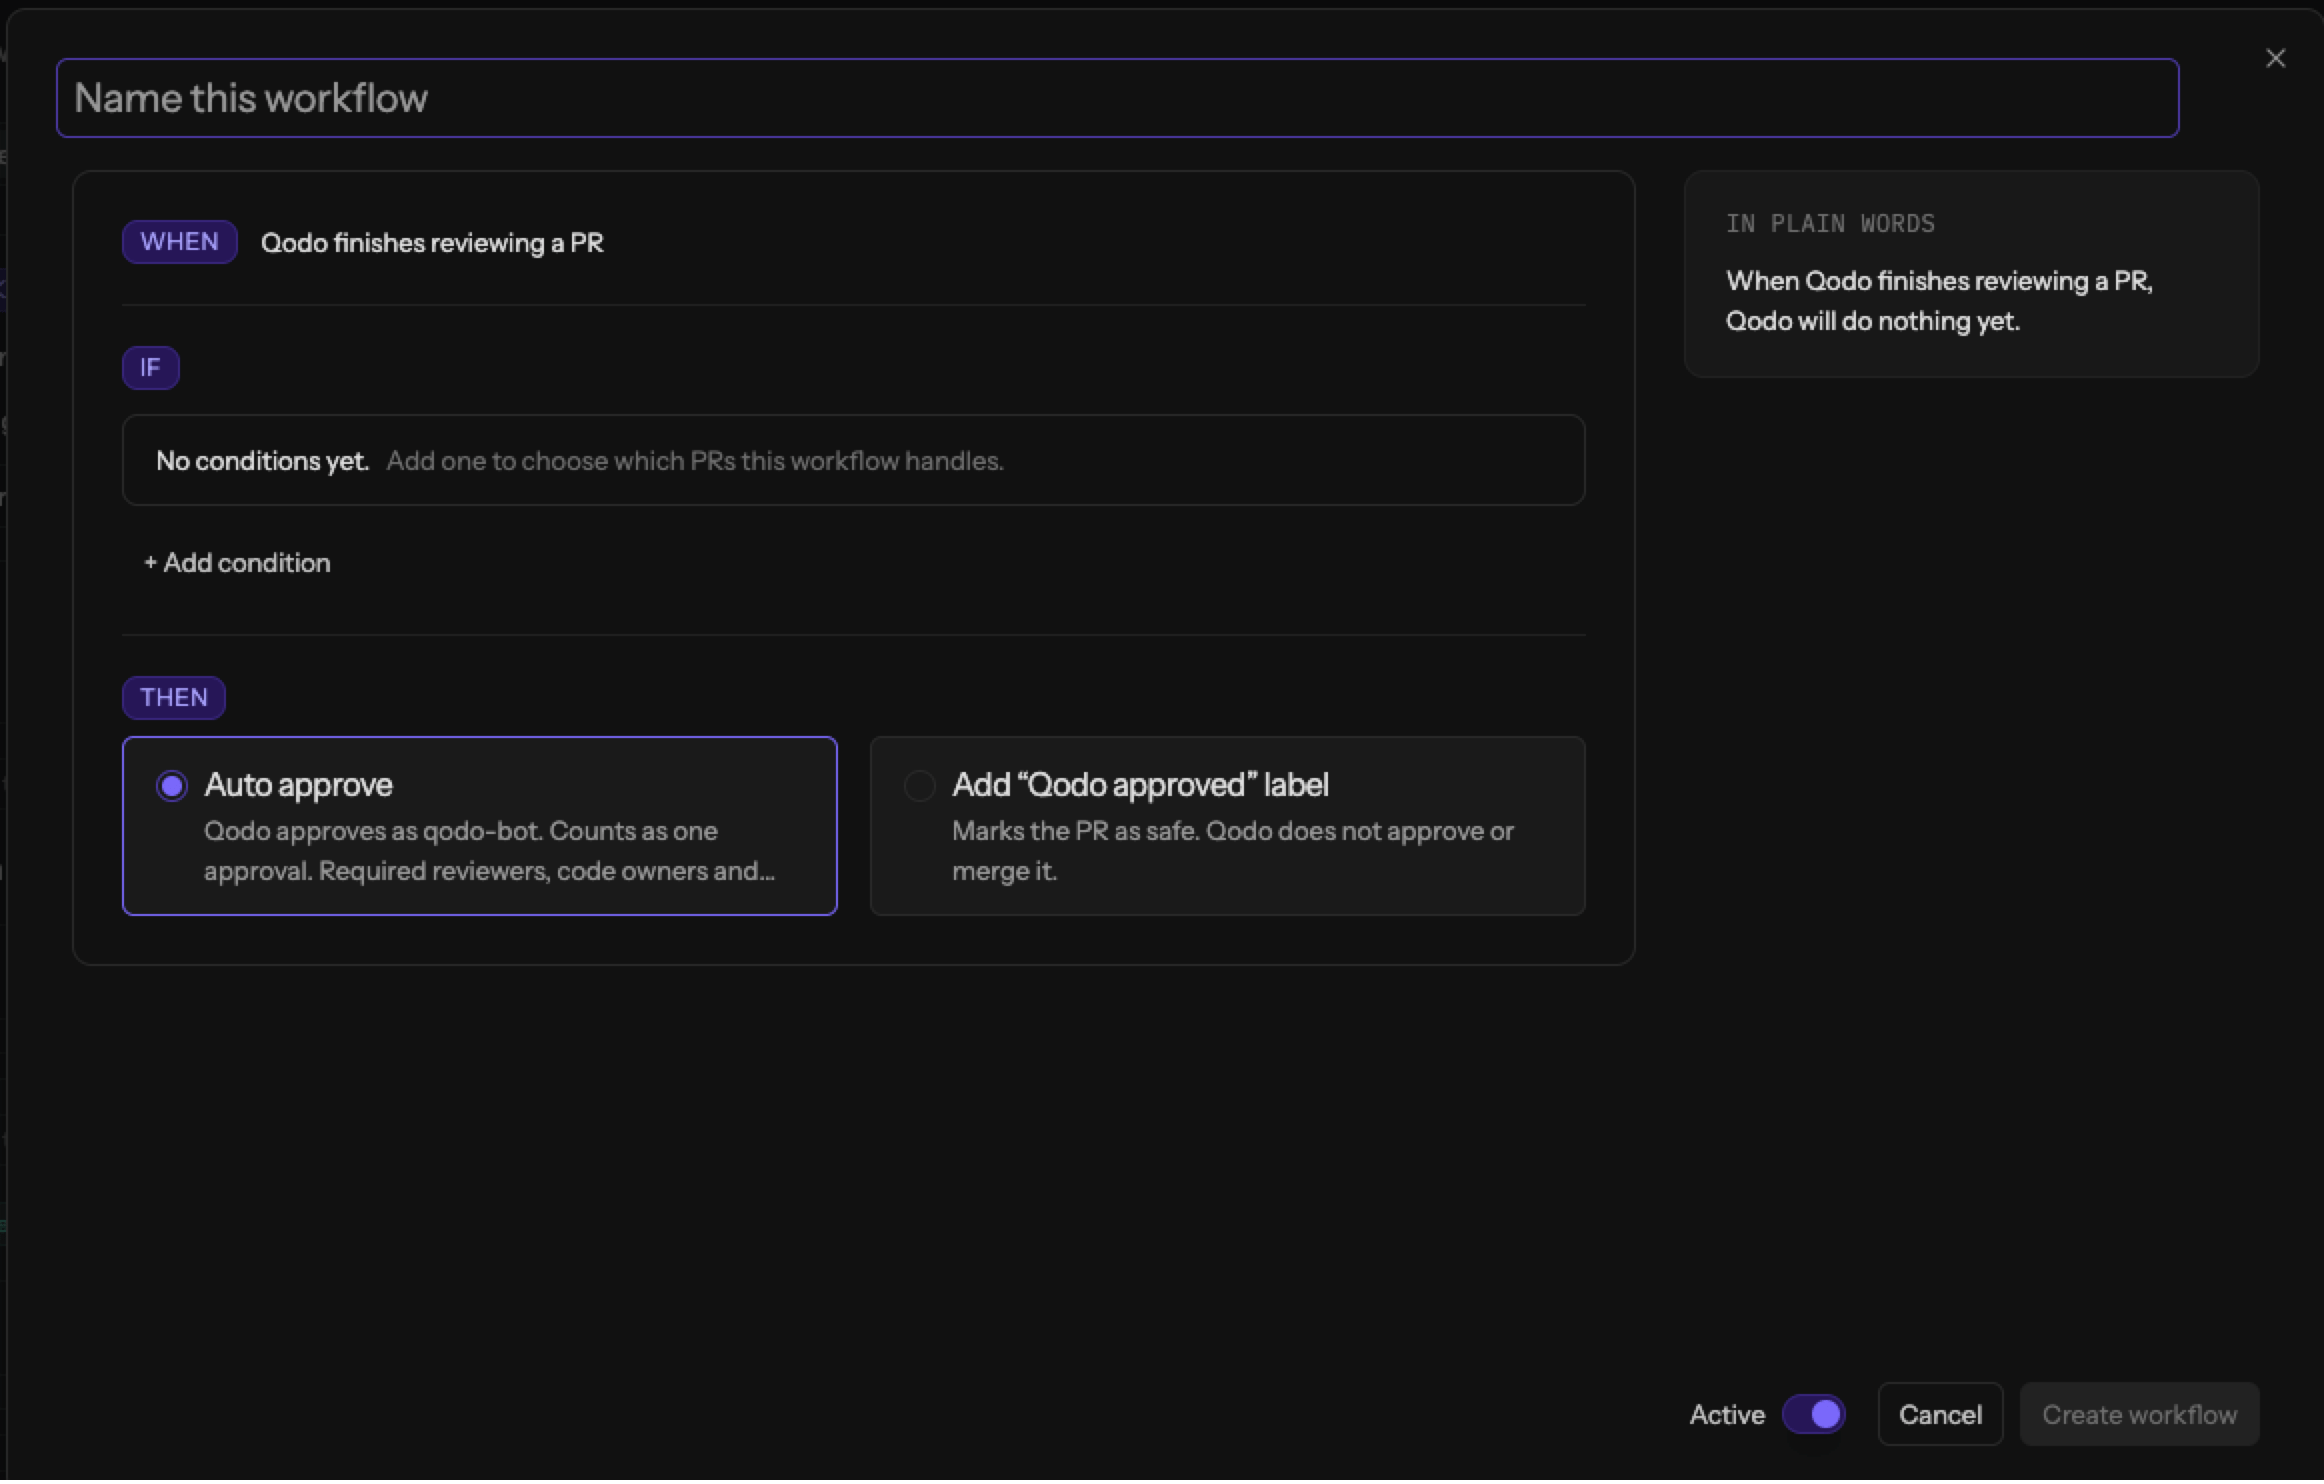
Each workflow must have a user-defined name. Enter a name when you create the workflow.1
Open the workflow builder
- Log in to the Qodo portal.
- In the left navigation, select Workflows.
- Click New workflow.
- Enter a name for the workflow.
2
Choose when the workflow runs
A workflow runs when Qodo finishes reviewing a pull request — both when the pull request is opened and when a new commit is pushed to it. This is shown under When and cannot be changed.
3
Set the conditions
Under If, define the criteria a pull request must meet for Qodo to perform the workflow action.Click + Add condition to add a criterion. You can use the following condition types.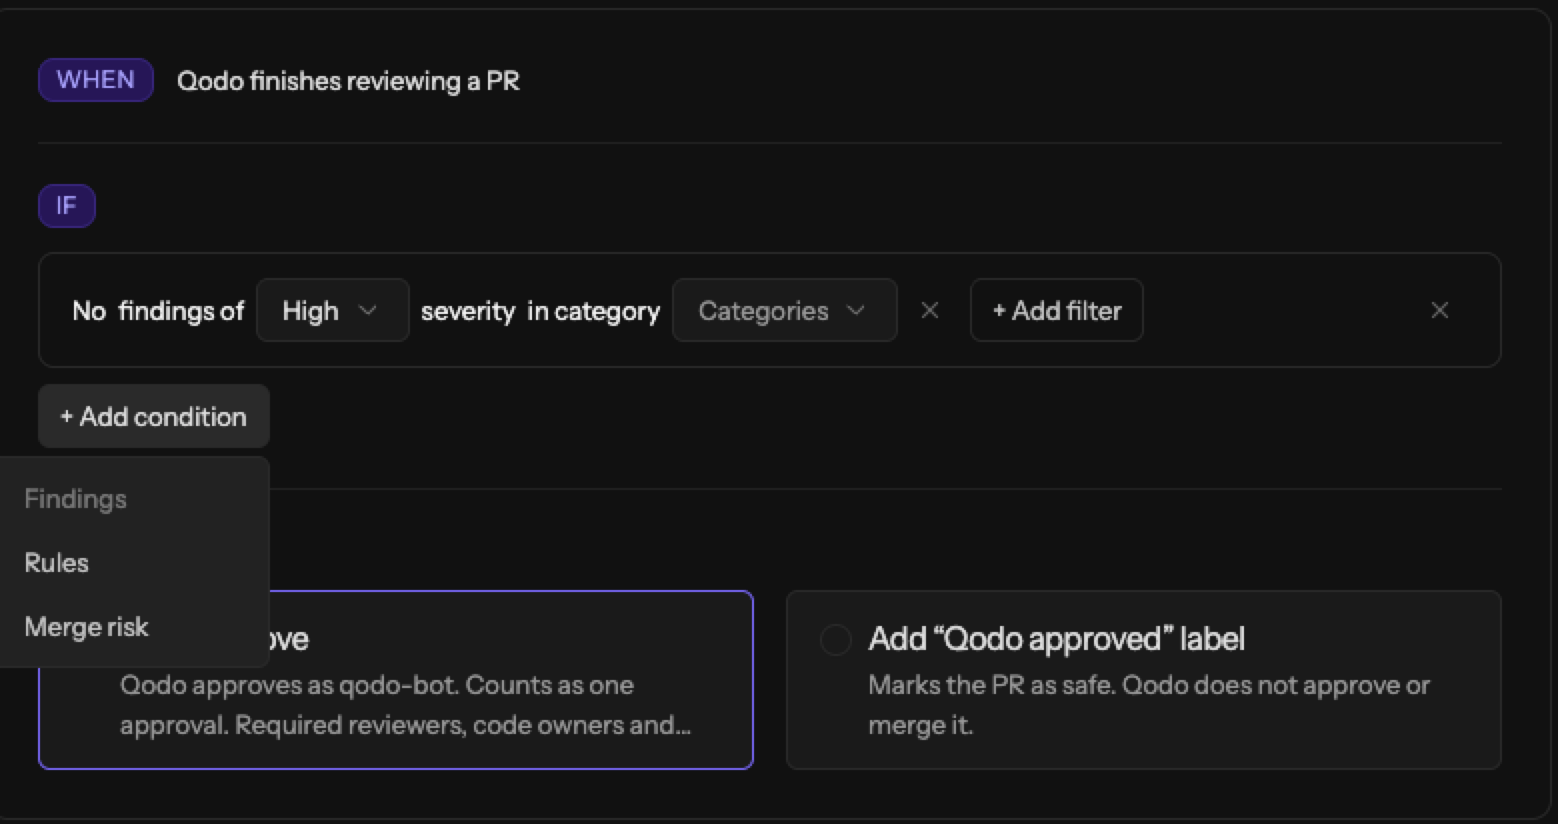
Findings
- Finding count: Choose whether the pull request has no findings or any findings.
- Severity: Select the severity levels to include, such as Any, High, Medium, Medium or higher, Low, or Low or higher.
- Categories: Select the finding categories to include, such as Correctness, Security, Reliability, Performance, Maintainability, Quality, Testability, Compliance, Accessibility, Architecture, or Observability.
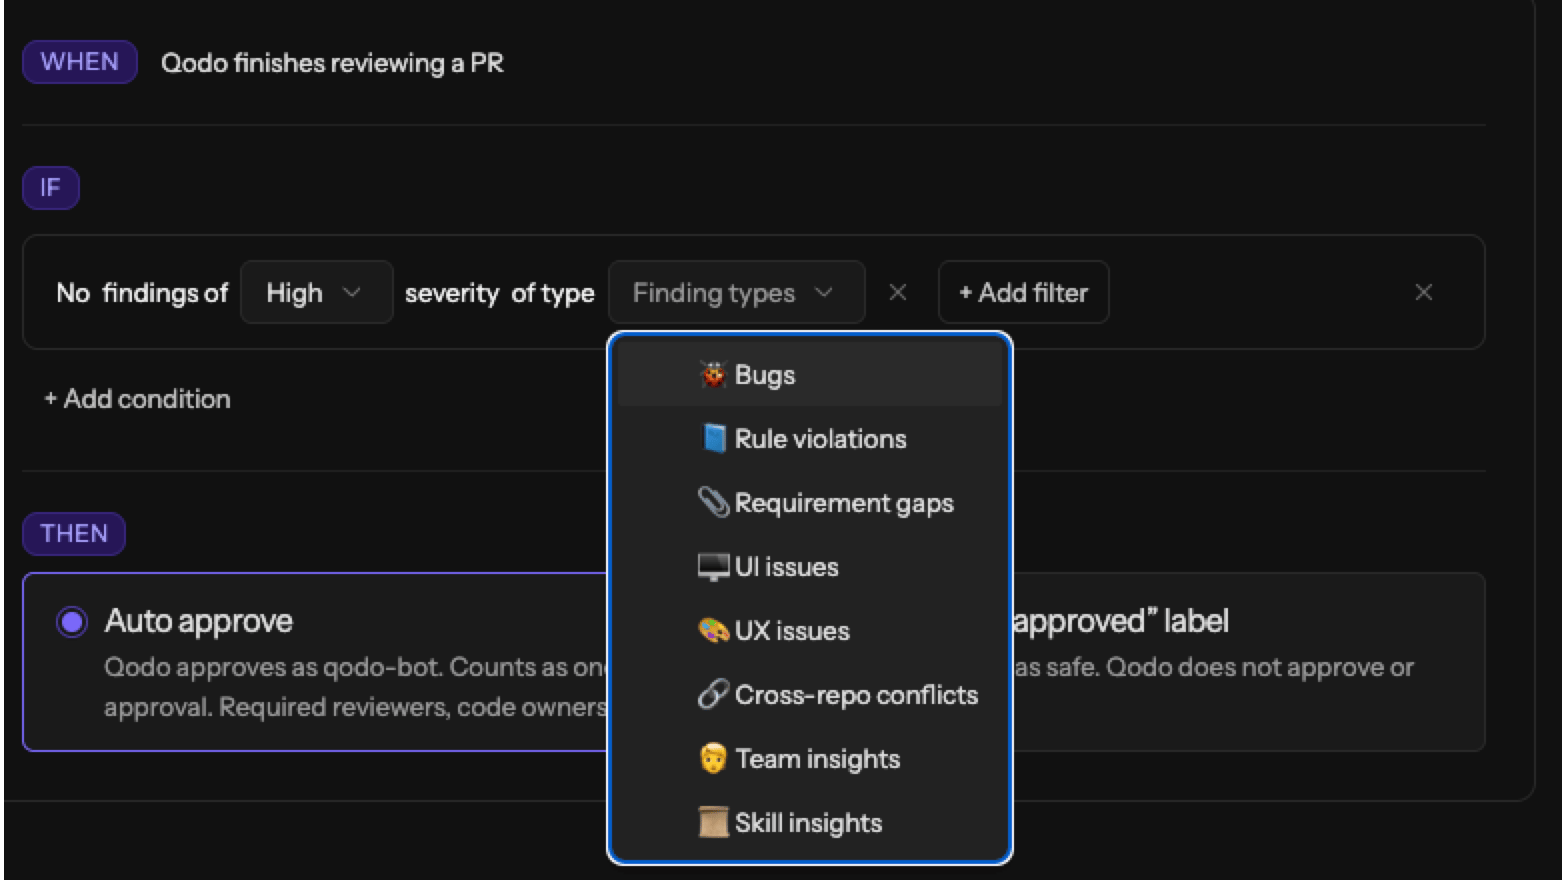
- Finding types: Select the types of findings to include, such as Bugs, Rule violations, Requirement gaps, UI issues, Cross-repo conflicts, Team insights, or Skill insights.
Rules
- Rule status: Choose Complies with or Violates.
- Rules: Select the rule to check.
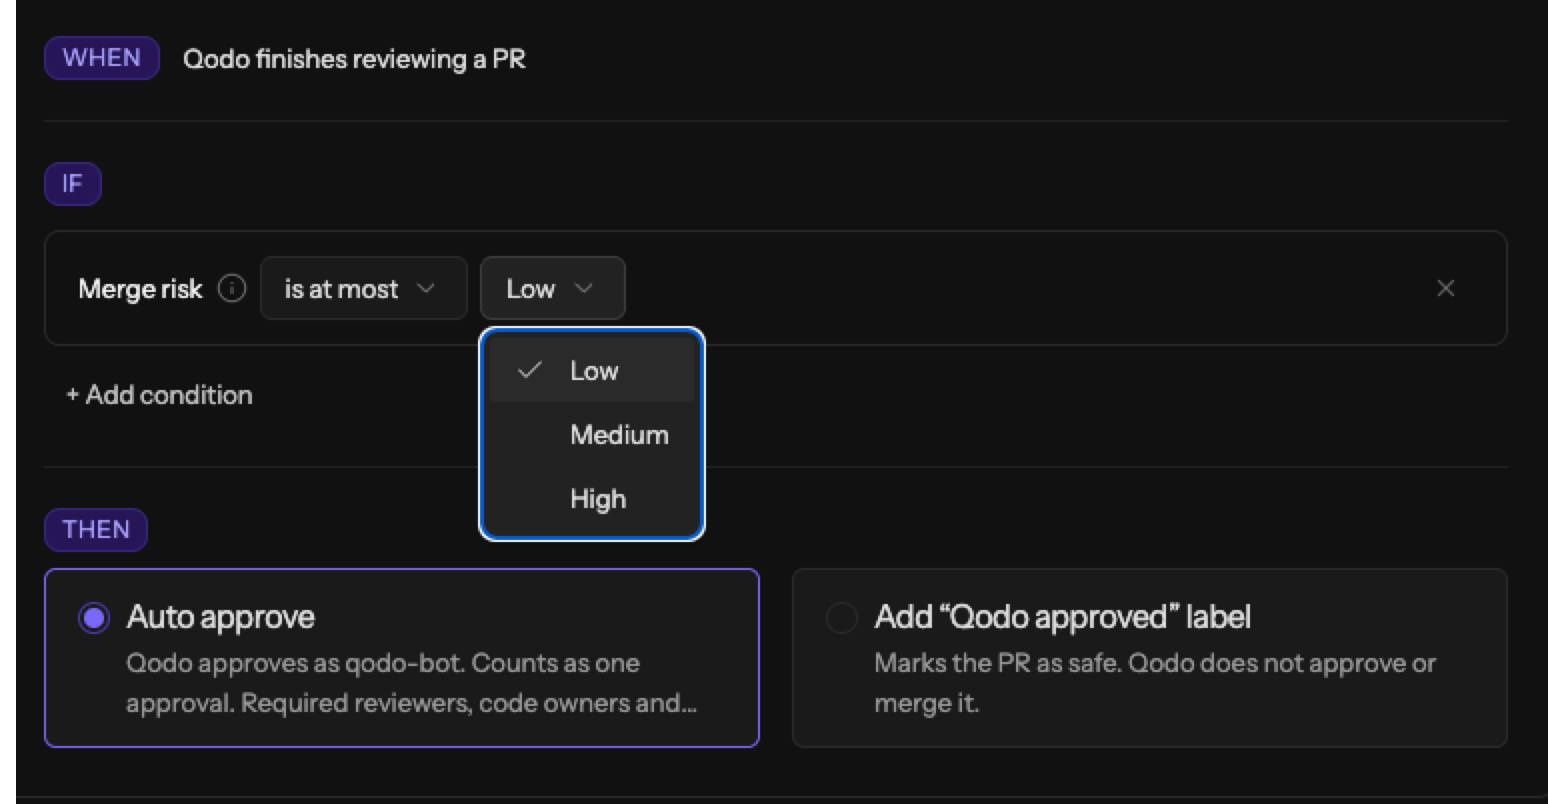
Merge risk
- Operator: Choose Is, Is at most, or Is at least.
- Merge risk: Select Low, Medium, or High.
Combine conditions
You can combine conditions to define more specific criteria.- Click + Add condition to add another condition.
- Click + Add or to create an alternative set of conditions.
4
Choose what Qodo does
Under Then, select the action Qodo performs when the workflow’s conditions are met.
- Auto approve: Qodo approves the pull request as
qodo-bot. Your Git provider’s branch protection rules still apply. This approval does not bypass any other required approvals or checks. - Add the Qodo approved label: Qodo adds the Qodo approved label to indicate that the pull request meets the workflow criteria. A person still needs to approve the pull request. A merge bot can monitor the label and take the next action according to your organization’s process.
5
Set the workflow status and save
New workflows are enabled by default. The Active toggle is on when you create the workflow. Turn it off if you want to create the workflow without activating it.The Create workflow button remains disabled until you enter a workflow name and add at least one condition.If you selected Auto approve as the action, clicking Create workflow opens the Turn on automatic approval? confirmation dialog. An admin must confirm this setting before the workflow can be saved. If you aren’t an admin, the dialog informs you that an admin must confirm the policy.Click Confirm to enable automatic approval and save the workflow.
6
Check the result
After the workflow runs, check the pull request in your Git provider to confirm that Qodo performed the selected action.
- For Auto approve, verify that
qodo-botapproved the pull request. - For Add the Qodo approved label, verify that the Qodo approved label appears on the pull request.
Set up approval guards for additional protection
Approval guards stop Qodo from approving certain pull requests, regardless of what your workflows specify. Qodo never approves a guarded pull request and never adds the Qodo approved label to it. Use approval guards to exclude specific repositories, paths, or authors from automated approval. This provides an additional layer of protection for code or contributors that always require human review, such as security-sensitive services, infrastructure repositories, or pull requests opened by bots and coding agents.Approval guards apply to the entire workspace. Unlike workflows, which can be configured at the workspace, Git organization, or repository level, approval guards are configured once for the workspace and apply across all its repositories. Changes to approval guards affect every repository in the workspace, regardless of the scope selected when configuring a workflow.
Configure approval guards
- Under Workflows, click Approval guards next to New workflow. The Approval guards dialog opens.
-
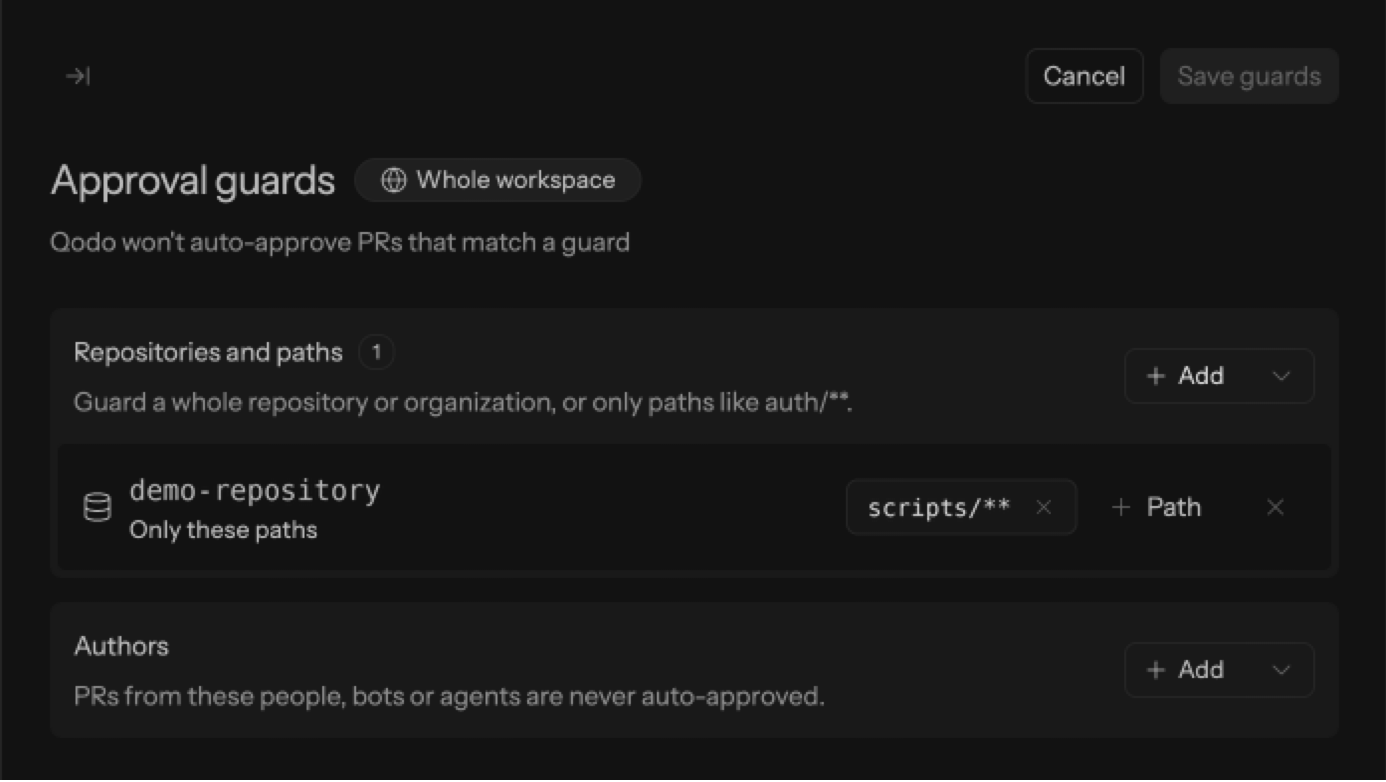
Configure the repositories, paths, and authors that Qodo must exclude from automated approval.
A. Select repositories and paths to guard
You can guard an entire Git organization, an entire repository, or specific paths within a repository.
- Under Repositories and paths, click + Add.
- Select a repository or Git organization.
-
Optionally, specify the paths to guard. For example,
auth/**guards pull requests that modify files under theauthdirectory. Leave the paths field empty to guard the entire selected repository or organization. -
Save the guard.
 The list shows the first 100 repositories. Search to find the others.
- Under Authors, click +Add.
- Select an author by Git login.
- Save the guard.
Example: protect one folder
Suppose automated approval is active for a repository, but you want every change to itsscripts folder to be reviewed by a person.
- Open Approval guards.
- Under Repositories and paths, click + Add.
- Select the repository, enter
scripts/**in the path field, and click Add. - Click Save guards.
scripts, Qodo reviews it as usual but does not approve it, even if it finds no issues and the pull request meets the workflow’s conditions. A person must review and approve it. Pull requests that do not modify files in scripts can still be approved automatically when they meet the workflow conditions.
How approval guards interact with workflows
Approval guards take precedence over workflows. If a pull request matches a guarded repository, path, or author, Qodo skips automated approval and does not add the Qodo approved label, even if the pull request meets an enabled workflow’s conditions. A pull request only needs to match one guard to be excluded. It does not need to match both a guarded repository or path and a guarded author.Remove approval guards
Remove a repository, path, or author guard when you want Qodo to resume evaluating matching pull requests for automated approval. Removing a guard does not automatically re-evaluate pull requests that were previously skipped. Their existing state remains unchanged until another event triggers re-evaluation, such as a new push, a dismissal, a status change, or a manual resolve. When Qodo re-evaluates the pull request, it uses the updated approval guard configuration.Manage workflows
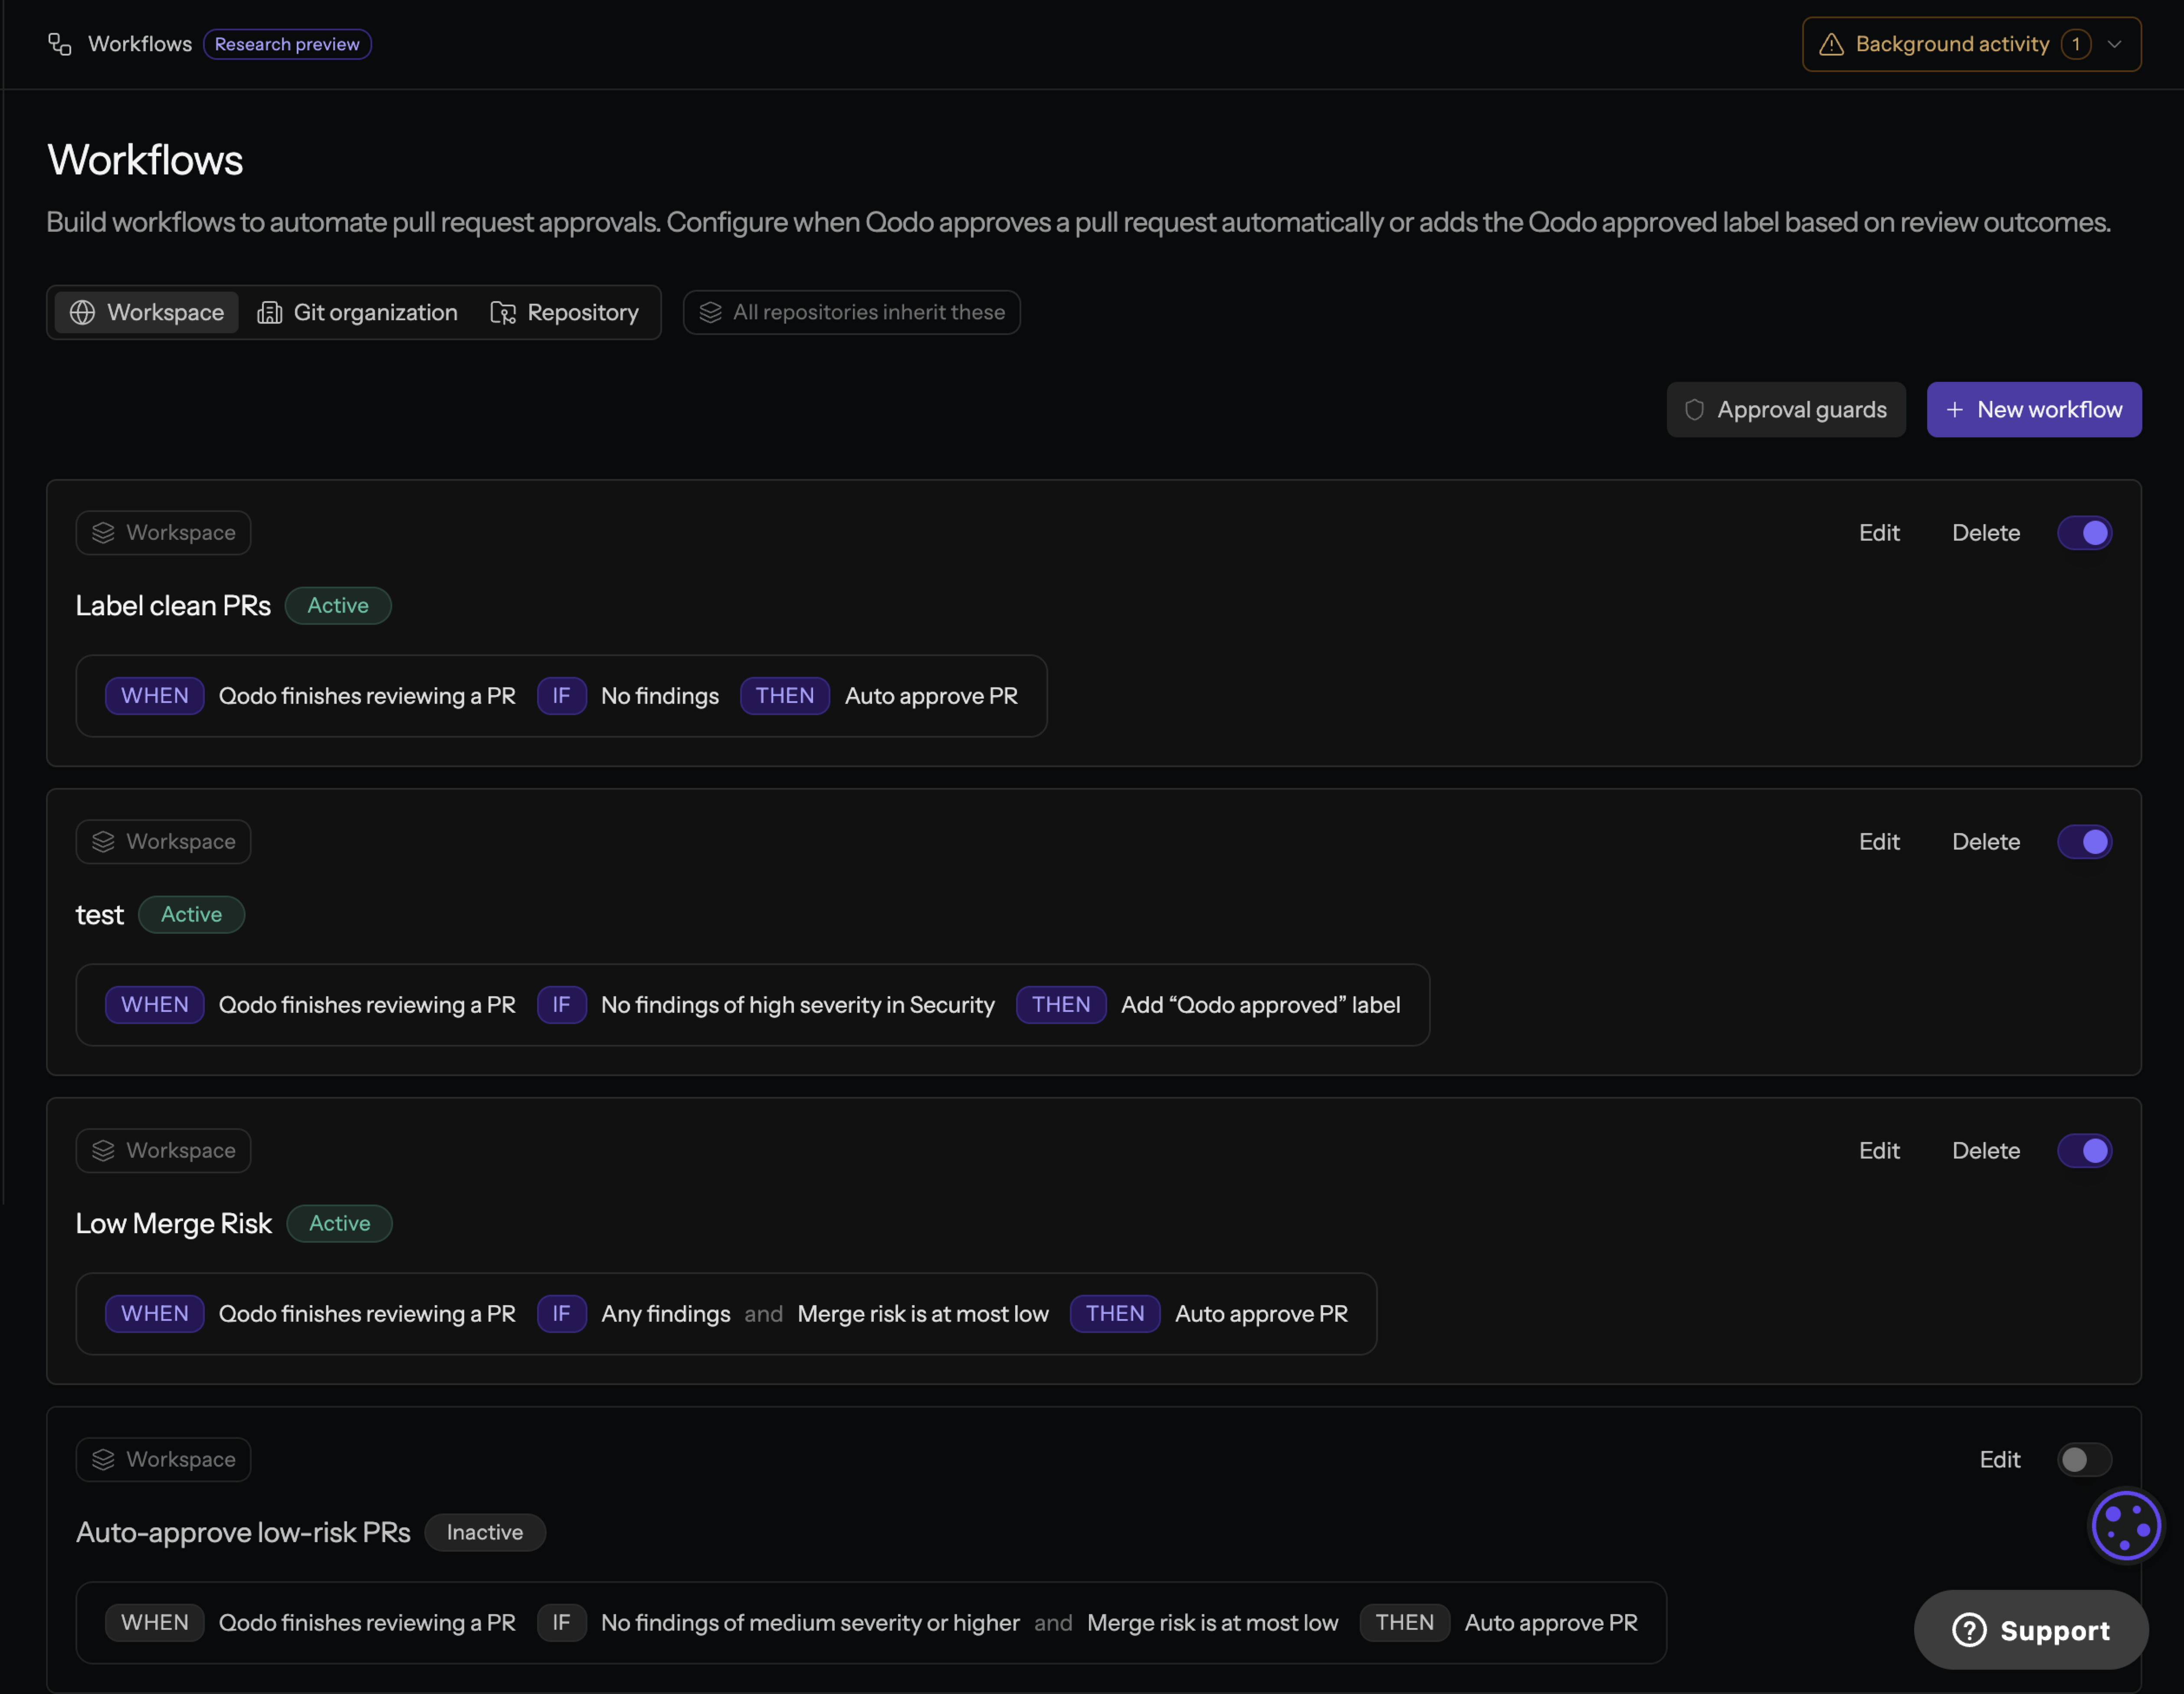
The workflow cards show the status of each workflow. The badge next to a workflow’s name indicates whether it is Active or Inactive. Use the switch on the right side of a workflow card to enable or disable the workflow. You can also:- Click Edit to change the workflow’s name, conditions, or action.
- Click Delete to remove the workflow.
- Click New workflow to create another workflow.