> ## Documentation Index
> Fetch the complete documentation index at: https://docs.qodo.ai/llms.txt
> Use this file to discover all available pages before exploring further.
# Install Qodo on GitLab Server
> Install guide for Qodo automated code review on a self-hosted GitLab Server instance, using the guided installation wizard.
export const onPrem_0 = undefined
export const showAllowlist_0 = true
This wizard can be used for Qodo multi-tenant, single-tenant, and on-premises deployments on GitLab Server. For `gitlab.com`, see {onPrem_0 ? GitLab Cloud : GitLab Cloud}.
Qodo works directly with GitLab Server, using a dedicated GitLab service account with Developer-level permissions to post code review comments on merge requests. Qodo can create this account for you, or your GitLab administrator can create it.
You can configure Qodo for selected repositories or across your entire GitLab group. Configuration typically takes around 5–10 minutes.
Once installed, Qodo automatically processes merge requests and delivers actionable insights, such as code reviews, descriptions, and improvement suggestions, directly within your GitLab workflow.
## Prerequisites
Before you begin, ensure you have:
* Access to your Qodo portal.
* The GitLab access that matches how the Qodo service account is created:
* Automatic setup: Instance Admin access, needed for Qodo to create its service account and set up webhooks.
* Manual setup: The Owner role on each group you connect, or the Maintainer role on each repository. Your GitLab administrator creates an instance service account for Qodo.
* Network access from Qodo to your GitLab URL.{showAllowlist_0 && <> If your GitLab instance uses an IP allowlist, see Allowlist Qodo's outbound IP addresses.}
## Access the GitLab integration
Log in to your Qodo portal.
Start the installation wizard in one of the following ways:
* **From the onboarding wizard**: If you're an organization admin signing in for the first time, the onboarding wizard opens automatically. In the Connect Git step, select **GitLab**. See [Set up Qodo with the onboarding wizard](/onboarding-wizard).
* **From the homepage**: On the homepage, in the top right-hand side, click the **+** button next to Git providers. On the selection page, choose **GitLab**.
Then select the self-managed option that appears after you select **GitLab**.
## Install Qodo on GitLab Server
Enter your **GitLab URL** (for example, `https://gitlab.example.com`), then choose how the Qodo service account is created.
Qodo creates the service account for you, using an instance Admin's access token.
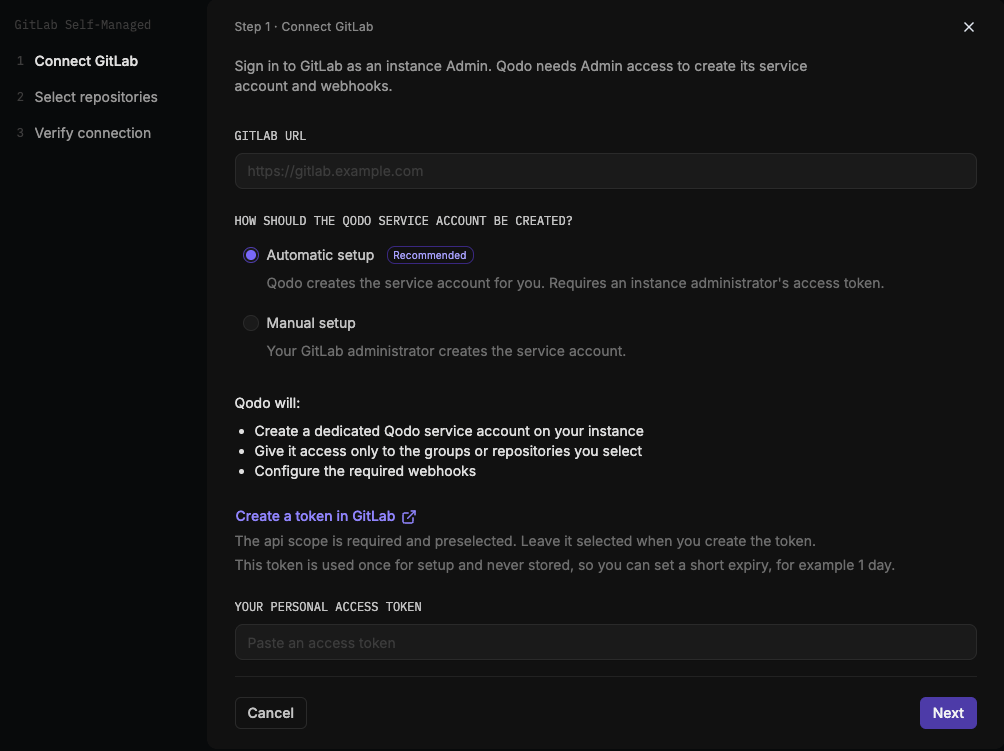 Under **How should the Qodo service account be created?**, select **Automatic setup**.
Qodo uses your token to:
* Create a dedicated Qodo service account on your instance.
* Give it access only to the groups or repositories you select.
* Configure the required webhooks.
Sign in as an instance Admin and click **Create a token in GitLab** to open your GitLab instance's access token settings directly. If your instance is on GitLab 16.6 or earlier, use **Create a token in GitLab 16.6 or earlier** instead.
The `api` scope is required and preselected. Leave it selected when you create the token.
This token is used once, to create the Qodo service account, and is never stored. You can set a short expiry, for example 1 day, and revoke it once installation completes.
Paste the token under **Your personal access token** and click **Next**.
Your GitLab administrator creates the service account, so you don't need instance Admin access.
Under **How should the Qodo service account be created?**, select **Automatic setup**.
Qodo uses your token to:
* Create a dedicated Qodo service account on your instance.
* Give it access only to the groups or repositories you select.
* Configure the required webhooks.
Sign in as an instance Admin and click **Create a token in GitLab** to open your GitLab instance's access token settings directly. If your instance is on GitLab 16.6 or earlier, use **Create a token in GitLab 16.6 or earlier** instead.
The `api` scope is required and preselected. Leave it selected when you create the token.
This token is used once, to create the Qodo service account, and is never stored. You can set a short expiry, for example 1 day, and revoke it once installation completes.
Paste the token under **Your personal access token** and click **Next**.
Your GitLab administrator creates the service account, so you don't need instance Admin access.
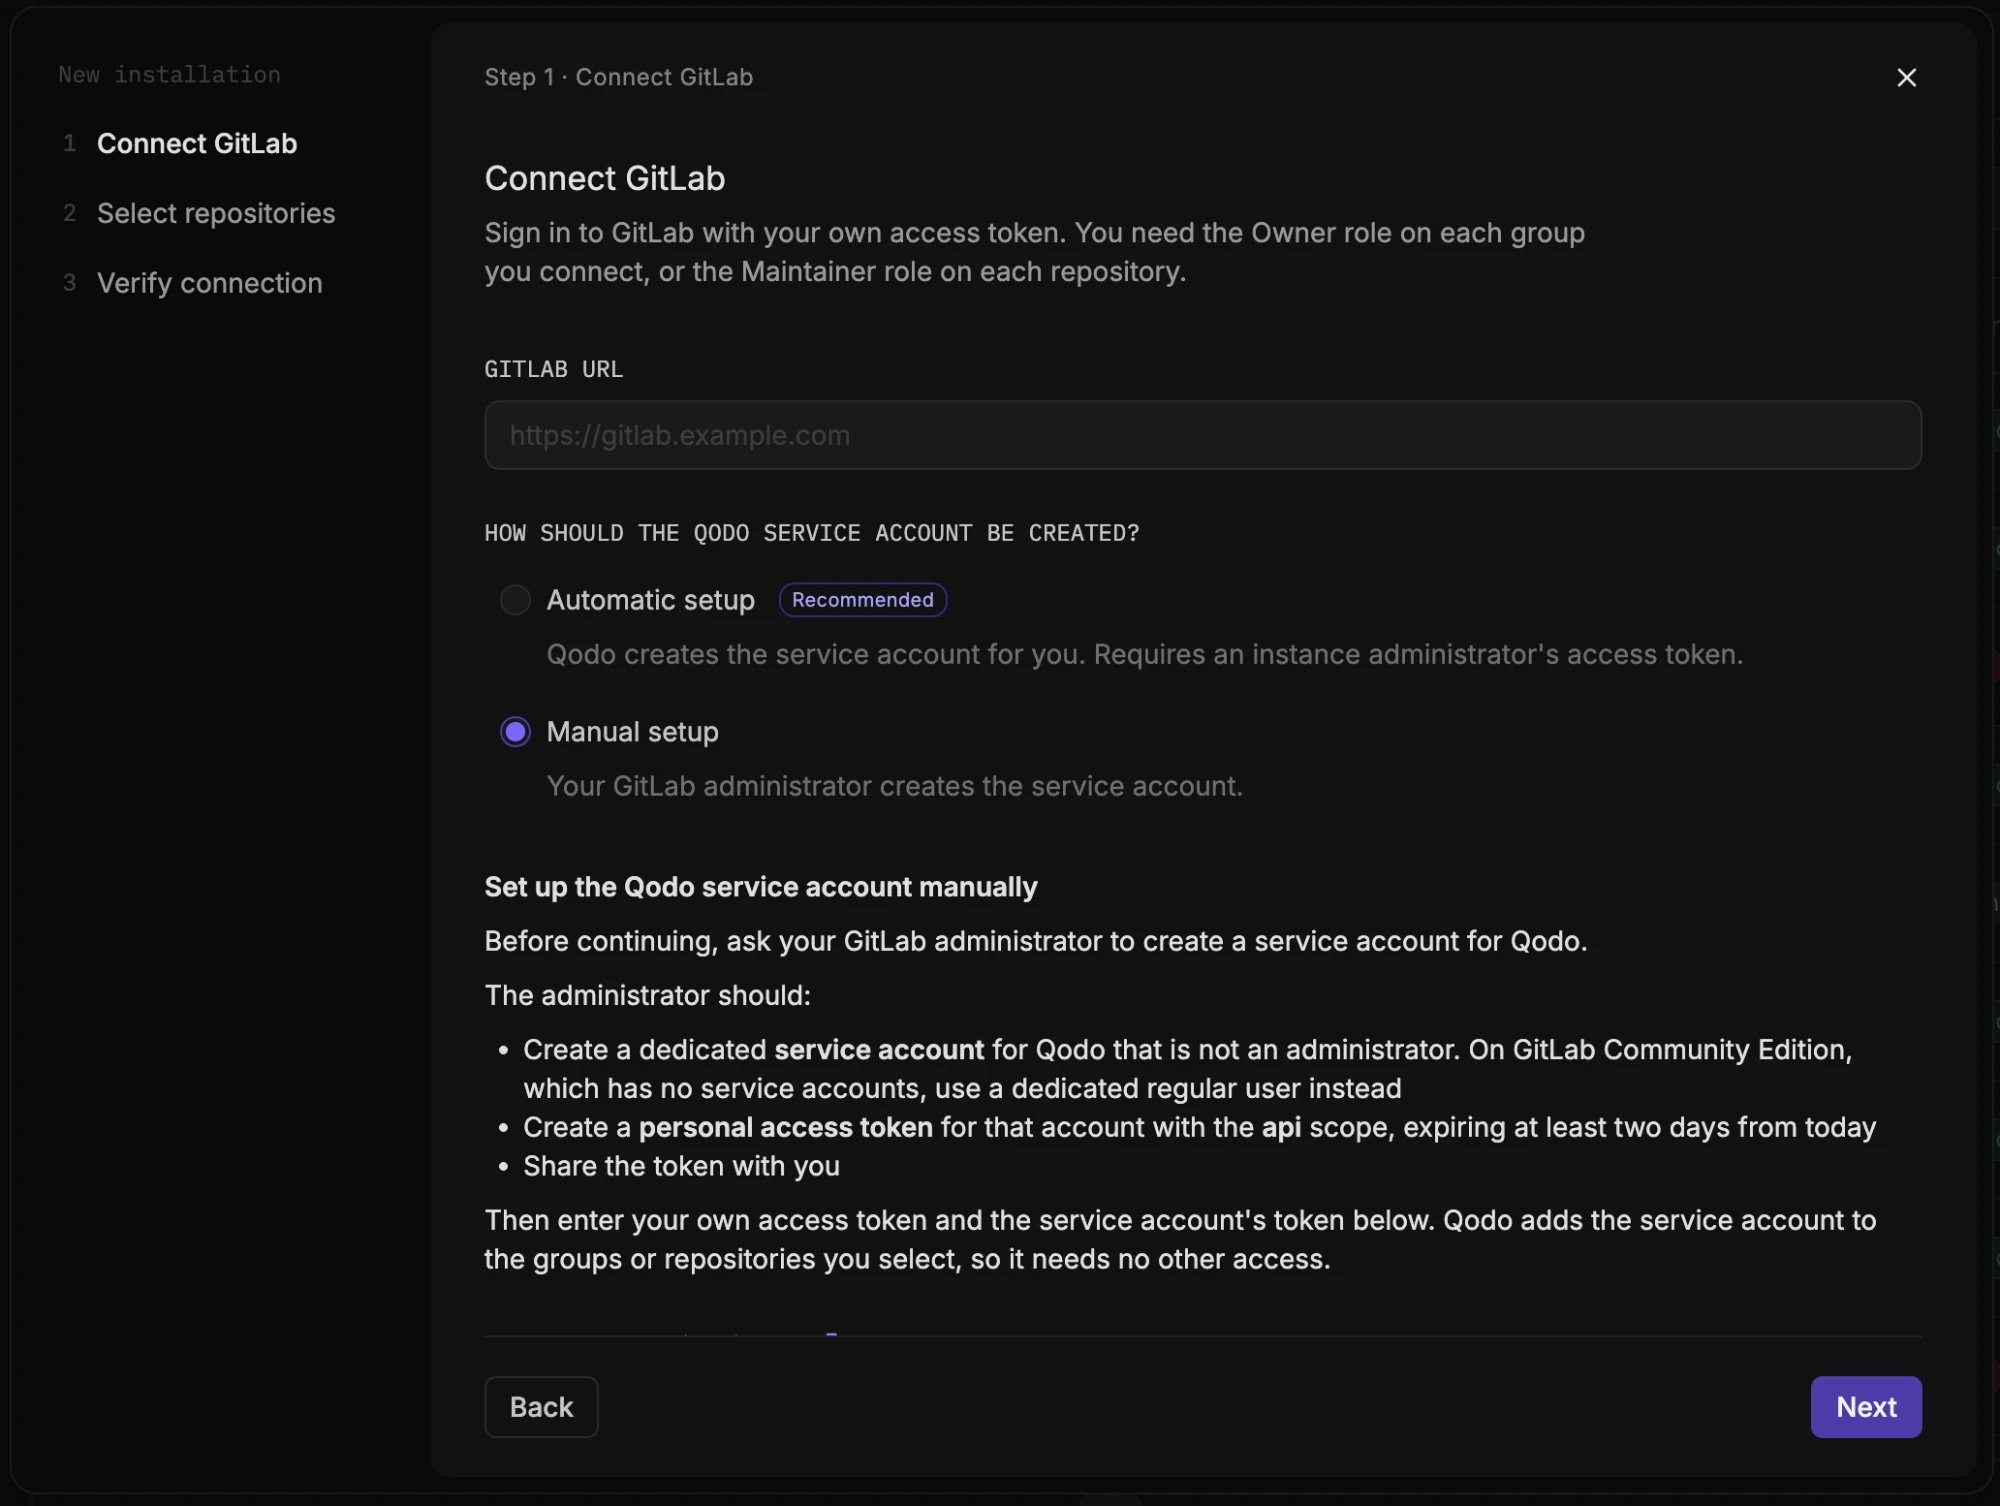 Under **How should the Qodo service account be created?**, select **Manual setup**.
Before continuing, ask your GitLab administrator to:
* In Admin > Service accounts, create a dedicated instance [service account](https://docs.gitlab.com/user/profile/service_accounts/) for Qodo that isn't an administrator. On GitLab Community Edition, which has no service accounts, create a dedicated regular user instead.
* Create a personal access token for that account with the `api` scope, expiring at least two days from today.
* Share the token with you.
Use an instance service account, not a group or project one. GitLab limits group and project service accounts to their own group or project. Qodo reuses the same account whenever you connect more groups or repositories, and connecting outside that group or project can fail.
Qodo checks each of the following when you connect. Any failure blocks the connection.
* The token is a personal access token on the service account itself, not a group or project access token.
* The token has the `api` scope, is active, and expires at least two days from today.
* The token doesn't belong to an instance administrator, or to the account you sign in with.
* On GitLab Enterprise Edition, the token belongs to an actual service account, not a person's account.
Qodo can't check whether the account is an instance service account. Make sure your administrator creates one, as described above.
Enter your own personal access token and the service account's token. Your token needs the `api` scope, and you need the Owner role on each group you connect, or the Maintainer role on each repository.
Qodo asks for your token again when you later add or remove groups and repositories, or uninstall Qodo. You need the same role then.
Qodo adds the service account to the groups or repositories you select, so it needs no other access.
Use this service account and its token for Qodo only.
* Qodo renews the token before it expires, which invalidates your copy. When Qodo is uninstalled, it revokes the token and leaves the account in place.
* If the instance already has an installation, Qodo keeps using its existing service account. A new token for that account replaces the stored one. A token for a different account is ignored.
* If the service account stops working and you can't create a working token for it, uninstall and reinstall Qodo, unless you can sign in with an instance Admin account.
Click **Next**.
Under **How should the Qodo service account be created?**, select **Manual setup**.
Before continuing, ask your GitLab administrator to:
* In Admin > Service accounts, create a dedicated instance [service account](https://docs.gitlab.com/user/profile/service_accounts/) for Qodo that isn't an administrator. On GitLab Community Edition, which has no service accounts, create a dedicated regular user instead.
* Create a personal access token for that account with the `api` scope, expiring at least two days from today.
* Share the token with you.
Use an instance service account, not a group or project one. GitLab limits group and project service accounts to their own group or project. Qodo reuses the same account whenever you connect more groups or repositories, and connecting outside that group or project can fail.
Qodo checks each of the following when you connect. Any failure blocks the connection.
* The token is a personal access token on the service account itself, not a group or project access token.
* The token has the `api` scope, is active, and expires at least two days from today.
* The token doesn't belong to an instance administrator, or to the account you sign in with.
* On GitLab Enterprise Edition, the token belongs to an actual service account, not a person's account.
Qodo can't check whether the account is an instance service account. Make sure your administrator creates one, as described above.
Enter your own personal access token and the service account's token. Your token needs the `api` scope, and you need the Owner role on each group you connect, or the Maintainer role on each repository.
Qodo asks for your token again when you later add or remove groups and repositories, or uninstall Qodo. You need the same role then.
Qodo adds the service account to the groups or repositories you select, so it needs no other access.
Use this service account and its token for Qodo only.
* Qodo renews the token before it expires, which invalidates your copy. When Qodo is uninstalled, it revokes the token and leaves the account in place.
* If the instance already has an installation, Qodo keeps using its existing service account. A new token for that account replaces the stored one. A token for a different account is ignored.
* If the service account stops working and you can't create a working token for it, uninstall and reinstall Qodo, unless you can sign in with an instance Admin account.
Click **Next**.
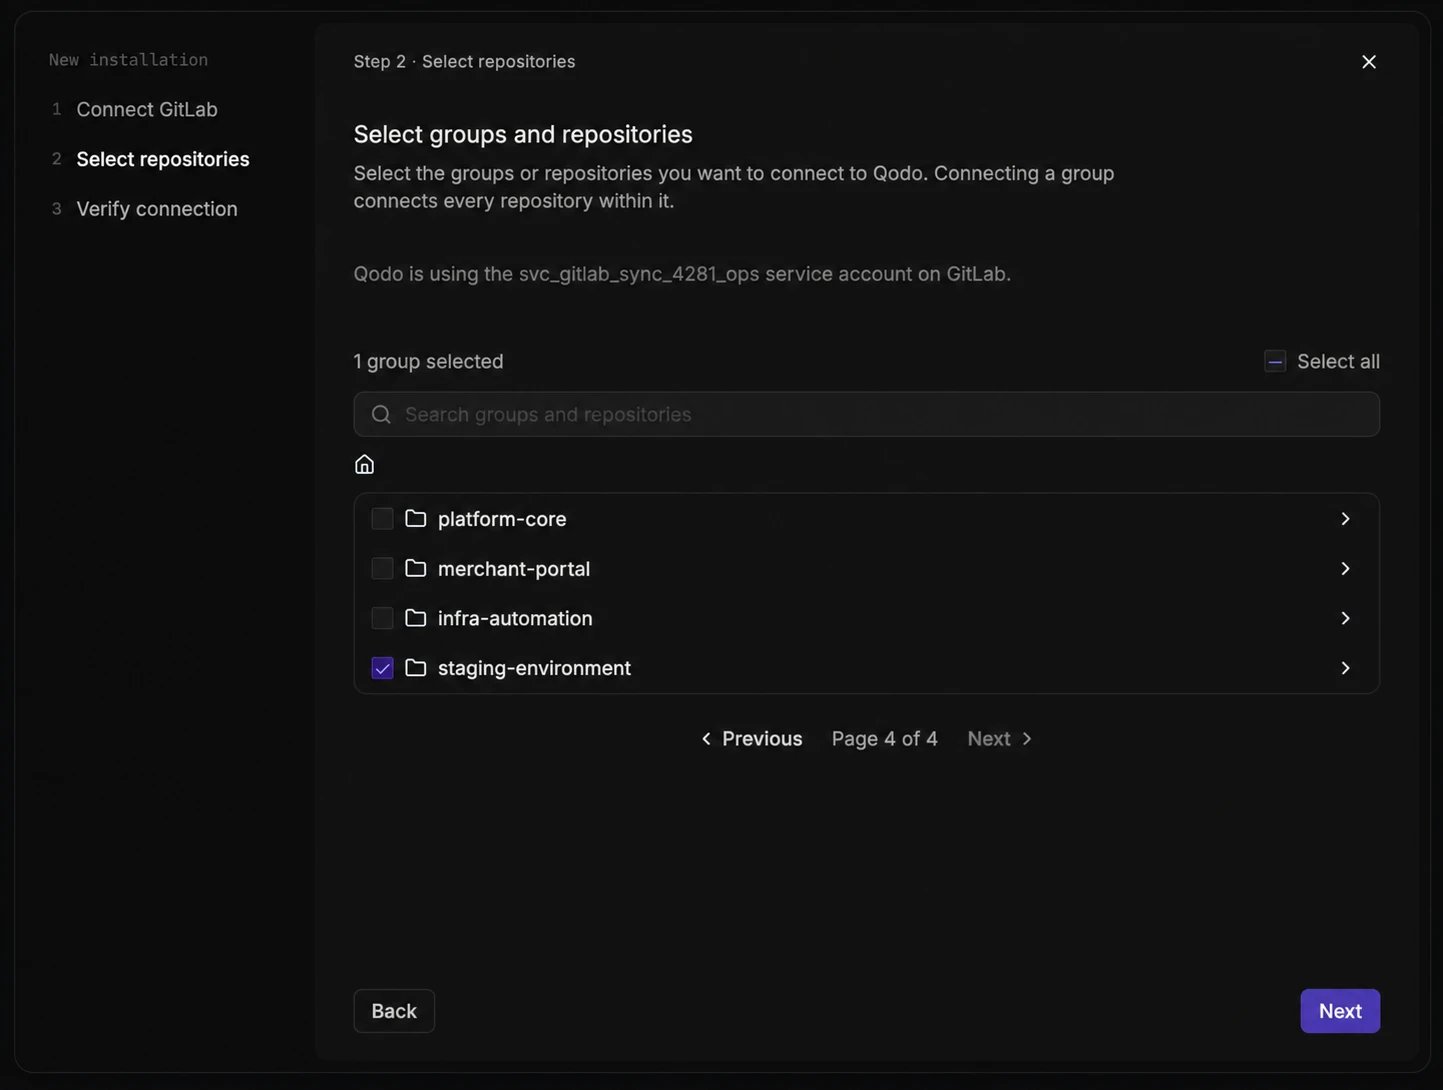 Find and select what to connect:
* Use the search bar to find a specific group or repository, or browse the list of top-level groups you have access to.
* Select a group to connect every repository within it, or drill into a group to select individual repositories.
* Select **Select all** to connect everything you have access to in one step.
On GitLab Community Edition and free-tier instances, which don't support group hooks, this step appears as "Select repositories" and Qodo creates a hook for each repository you select. On tiers with group hooks, it appears as "Select groups and repositories", and selecting a group creates a group hook.
Repositories in personal namespaces aren't supported.
Click **Next**.
Find and select what to connect:
* Use the search bar to find a specific group or repository, or browse the list of top-level groups you have access to.
* Select a group to connect every repository within it, or drill into a group to select individual repositories.
* Select **Select all** to connect everything you have access to in one step.
On GitLab Community Edition and free-tier instances, which don't support group hooks, this step appears as "Select repositories" and Qodo creates a hook for each repository you select. On tiers with group hooks, it appears as "Select groups and repositories", and selecting a group creates a group hook.
Repositories in personal namespaces aren't supported.
Click **Next**.
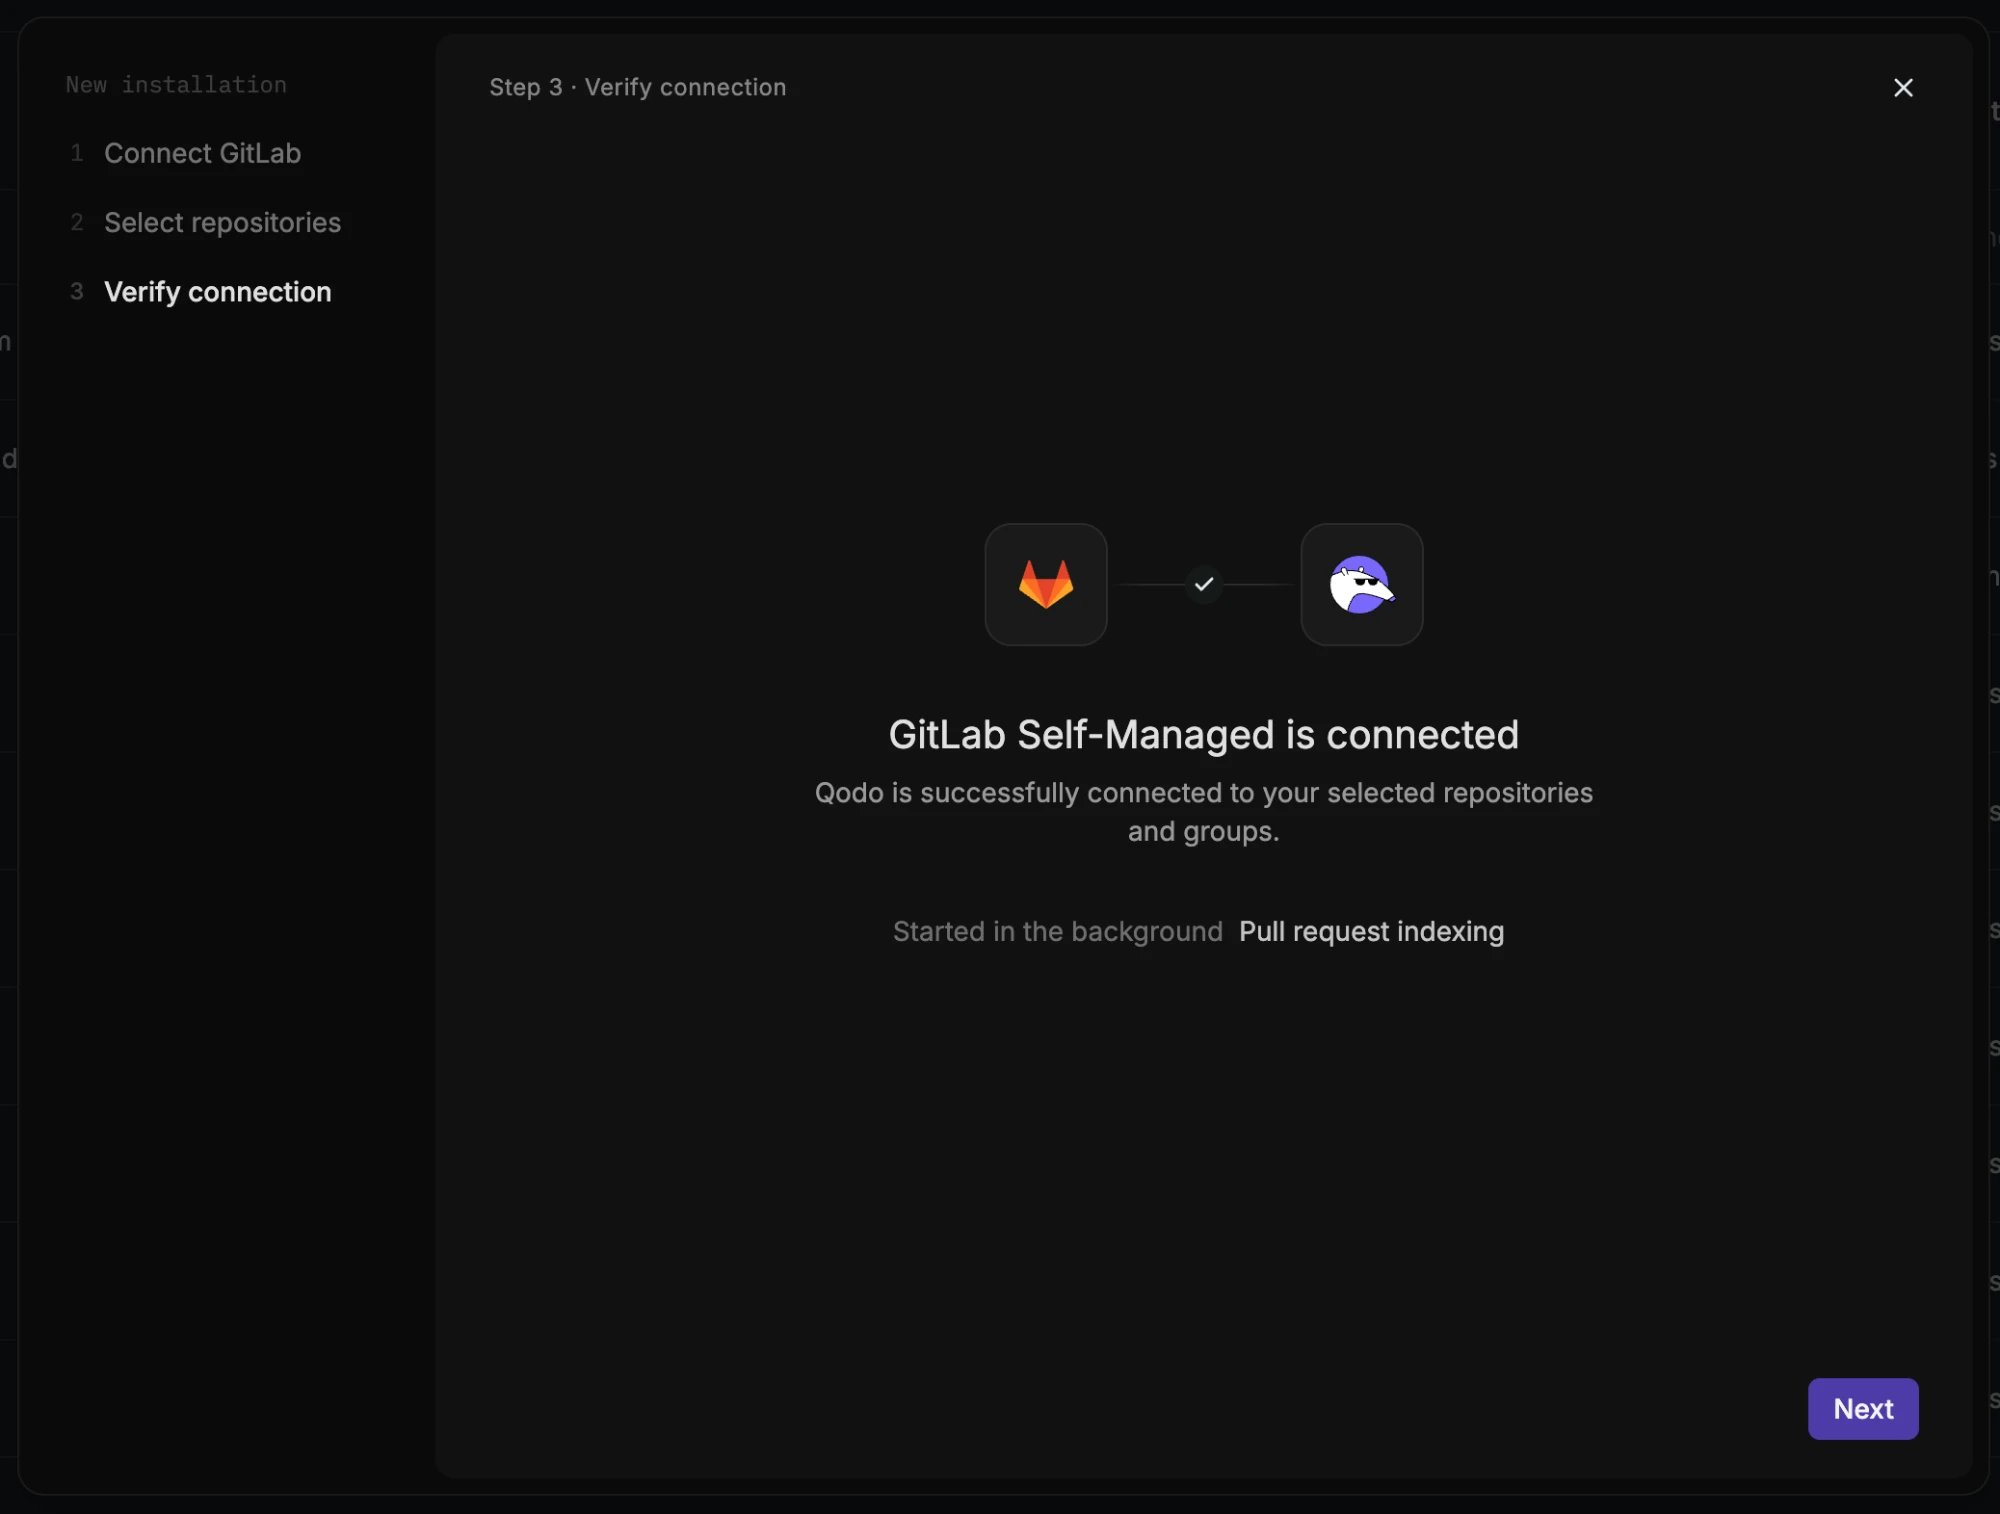 Qodo confirms it's connected to your selected repositories and groups, and starts pull request indexing in the background.
Click **Next**.
Qodo is now active on the repositories in the groups you selected. To connect more repositories under an existing installation, use [Manage the repositories in an installation](/governance/repositories/installations#manage-the-repositories-in-an-installation) on the Repositories page. To connect a different group, return to this wizard.
If you're connecting your Git provider as part of the onboarding wizard, the wizard continues to the next onboarding step once the connection completes. See [Set up Qodo with the onboarding wizard](/onboarding-wizard).
## What happens after you connect
Qodo starts building context for your code reviews, and the following processes run automatically in the background:
* [Repository sync](/governance/repositories/installations#view-repository-sync-status-from-anywhere-in-the-portal): Syncs each connected repository with Qodo.
* [Pull request indexing](/governance/repositories/manage-repositories#check-repository-pr-history-indexing-status): Indexes each repository's pull request history.
* [Cross-repo discovery](/governance/repositories/relationships#view-cross-repo-discovery-status-from-anywhere-in-the-portal): Finds relationships between your repositories.
Track their progress from **Background activity** in the top-right corner of the portal.
It's recommended to import your team's existing rules and skills, which lets Qodo enforce your coding standards in its reviews. See [Importing rules and skills](/governance/rule-enforcement/building-review-standards#importing-rules-and-skills).
## Verify the installation
Open a new merge request in one of the connected repositories and confirm Qodo is triggered automatically.
Add a comment using one of the supported commands:
* `/agentic_describe`
* `/agentic_review`
Qodo should respond with a review or MR summary directly on the merge request.
## Troubleshooting
If Qodo doesn't respond on the merge request, check that GitLab can reach Qodo's webhook URL:
In GitLab, navigate to the webhook settings of the connected group or repository.
Copy the URL of the webhook Qodo created. The URL is different for each Qodo installation.
Confirm that your network allows GitLab to reach that URL.
## Next steps
* [Repositories page](/governance/repositories): Manage which repositories Qodo is active on, or remove an installation.
* [Trigger a code review](/code-review/use-qodo-in-prs): Run a review automatically or on demand.
* [Migration guide](/install-qodo/gitlab/migration): Migrate an existing Qodo installation.
This documentation is built and hosted on [Mintlify](https://mintlify.com), a developer documentation platform.
Qodo confirms it's connected to your selected repositories and groups, and starts pull request indexing in the background.
Click **Next**.
Qodo is now active on the repositories in the groups you selected. To connect more repositories under an existing installation, use [Manage the repositories in an installation](/governance/repositories/installations#manage-the-repositories-in-an-installation) on the Repositories page. To connect a different group, return to this wizard.
If you're connecting your Git provider as part of the onboarding wizard, the wizard continues to the next onboarding step once the connection completes. See [Set up Qodo with the onboarding wizard](/onboarding-wizard).
## What happens after you connect
Qodo starts building context for your code reviews, and the following processes run automatically in the background:
* [Repository sync](/governance/repositories/installations#view-repository-sync-status-from-anywhere-in-the-portal): Syncs each connected repository with Qodo.
* [Pull request indexing](/governance/repositories/manage-repositories#check-repository-pr-history-indexing-status): Indexes each repository's pull request history.
* [Cross-repo discovery](/governance/repositories/relationships#view-cross-repo-discovery-status-from-anywhere-in-the-portal): Finds relationships between your repositories.
Track their progress from **Background activity** in the top-right corner of the portal.
It's recommended to import your team's existing rules and skills, which lets Qodo enforce your coding standards in its reviews. See [Importing rules and skills](/governance/rule-enforcement/building-review-standards#importing-rules-and-skills).
## Verify the installation
Open a new merge request in one of the connected repositories and confirm Qodo is triggered automatically.
Add a comment using one of the supported commands:
* `/agentic_describe`
* `/agentic_review`
Qodo should respond with a review or MR summary directly on the merge request.
## Troubleshooting
If Qodo doesn't respond on the merge request, check that GitLab can reach Qodo's webhook URL:
In GitLab, navigate to the webhook settings of the connected group or repository.
Copy the URL of the webhook Qodo created. The URL is different for each Qodo installation.
Confirm that your network allows GitLab to reach that URL.
## Next steps
* [Repositories page](/governance/repositories): Manage which repositories Qodo is active on, or remove an installation.
* [Trigger a code review](/code-review/use-qodo-in-prs): Run a review automatically or on demand.
* [Migration guide](/install-qodo/gitlab/migration): Migrate an existing Qodo installation.
This documentation is built and hosted on [Mintlify](https://mintlify.com), a developer documentation platform.