> ## Documentation Index
> Fetch the complete documentation index at: https://docs.qodo.ai/llms.txt
> Use this file to discover all available pages before exploring further.
# Install Qodo on Azure DevOps (on-premises)
> Install and configure the Azure DevOps integration for Qodo on-premises deployments.
Qodo works natively with Azure DevOps, using Microsoft Entra ID to authenticate and authorize access to Azure DevOps APIs, pull request workflows, and Azure Boards work items.
You can configure Qodo for a single repository or project, or expand it across multiple projects within your Azure DevOps organization.
Setup typically takes around 20 minutes and includes creating a Microsoft Entra ID application, configuring authentication, and setting up webhooks.
Once configured, Qodo monitors pull requests and publishes outputs such as reviews, descriptions, and improvement suggestions directly to your Azure DevOps pull requests.
## Prerequisites
Before you begin, ensure you have:
* A Qodo on-premises environment configured for Azure DevOps, including the Qodo webhook endpoint. Azure connection details (tenant ID, client ID, and client secret) are generated as part of the Microsoft Entra ID application registration during setup.
* Permissions to create an app registration in Microsoft Entra ID.
* Permissions to create users in Microsoft Entra ID and add users to the Azure DevOps organization (Microsoft Entra ID User Administrator and Azure DevOps Organization Owner), and access to the Azure DevOps projects that will be integrated with Qodo.
## Installation
### Step 1: Create an application registration
Sign in to the [Microsoft Azure portal](https://portal.azure.com/).
Use the search bar to navigate to **App registrations**.
Click **New registration** and enter the following:
* **Application Name:** Qodo
* **Supported account types:** Select **Accounts in any organizational directory (Any Microsoft Entra ID tenant – Multitenant)**
* **Application Logo:** [https://www.qodo.ai/wp-content/uploads/2025/03/qodo-logo.svg](https://www.qodo.ai/wp-content/uploads/2025/03/qodo-logo.svg)
Navigate to **Manage → Authentication → Add Redirect URL**.
In the popup:
1. Select **Web Applications → Web**.
2. Enter the callback URL. The webhook URL is unique per customer. For example: `https://admin..qodo.ai/api/ado/oauth/callback`
3. Click **Configure**.
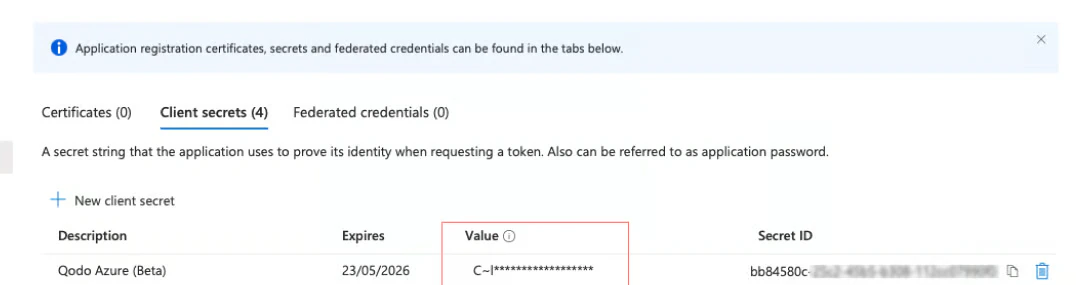
Navigate to **Manage → Certificates & secrets → New client secret**.
In the popup:
1. Add a description and select an expiration.
2. Click **Add** to generate a client secret and save the Value. This will not be visible later.
 Navigate to **Manage → API permissions → Add a permission**.
In the popup:
1. Select the **Azure DevOps** card.
2. Add the Azure DevOps permission (`user_impersonation`).
3. Click **Add permissions**.
4. Click **Grant admin consent** for the directory.
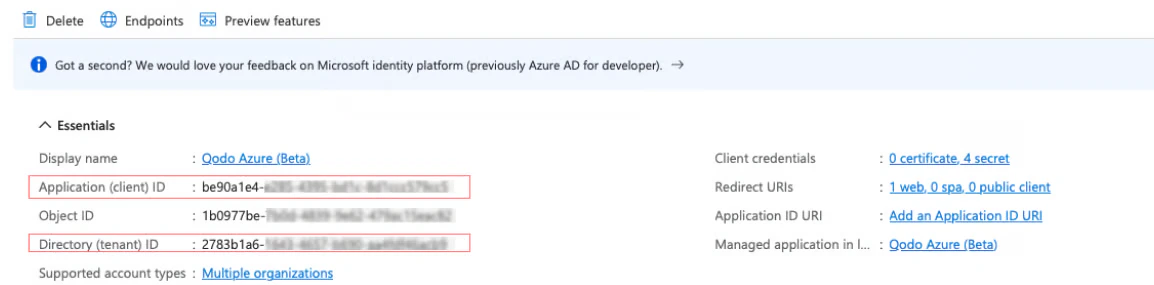
The **Overview** page displays all the relevant information for the following steps. Copy and save the **Application (client) ID** and **Directory (tenant) ID**.
Navigate to **Manage → API permissions → Add a permission**.
In the popup:
1. Select the **Azure DevOps** card.
2. Add the Azure DevOps permission (`user_impersonation`).
3. Click **Add permissions**.
4. Click **Grant admin consent** for the directory.
The **Overview** page displays all the relevant information for the following steps. Copy and save the **Application (client) ID** and **Directory (tenant) ID**.
 ### Step 2: Create a new user
In the Microsoft Azure portal, create a new user named `Qodo` that will be used as a bot (service) account for Qodo.
1. Navigate to **Manage → Users → New user**.
2. In the popup, enter the user details and assign the **Cloud Application Administrator** role.
### Step 3: Create a service account
The Microsoft Entra ID user that authenticates and creates the OAuth token must be the same user (same email / UPN) that is added to the Azure DevOps organization. If these do not match, the integration will not work.
When using non-Azure domains (for example, Gmail), Azure may automatically create an `@onmicrosoft.com` user. Ensure that the same identity (email / UPN) is used consistently in both Microsoft Entra ID and Azure DevOps.
Sign in to the Azure DevOps portal (for example, `https://dev.azure.com/`).
Navigate to **Organization settings → Users** and add the `Qodo` user created in the previous step to the Azure DevOps organization.
Assign the user **Access Level: Basic** and add it to the **Project Administrators** group for the project the bot should access.
### Step 4: Register the application with Qodo
This step connects your Microsoft Entra ID application to your Qodo on-premises environment using the Qodo admin portal.
Open an incognito or private browser window and verify that no Microsoft account is currently signed in. This ensures you authenticate using the correct service account.
Sign in to Microsoft Entra ID using the dedicated service account created in Step 2.
In the same browser window, navigate to your Qodo admin portal and open the Azure DevOps configuration section.
Click **Edit** and provide the following details from the app registration in the Microsoft Azure portal:
* **OAuth Application ID** (Application (client) ID from the **Overview** tab)
* **OAuth Application Secret** (use the secret **value**, not the secret ID)
* **Entra Tenant ID** (Directory (tenant) ID from the **Overview** tab)
### Step 2: Create a new user
In the Microsoft Azure portal, create a new user named `Qodo` that will be used as a bot (service) account for Qodo.
1. Navigate to **Manage → Users → New user**.
2. In the popup, enter the user details and assign the **Cloud Application Administrator** role.
### Step 3: Create a service account
The Microsoft Entra ID user that authenticates and creates the OAuth token must be the same user (same email / UPN) that is added to the Azure DevOps organization. If these do not match, the integration will not work.
When using non-Azure domains (for example, Gmail), Azure may automatically create an `@onmicrosoft.com` user. Ensure that the same identity (email / UPN) is used consistently in both Microsoft Entra ID and Azure DevOps.
Sign in to the Azure DevOps portal (for example, `https://dev.azure.com/`).
Navigate to **Organization settings → Users** and add the `Qodo` user created in the previous step to the Azure DevOps organization.
Assign the user **Access Level: Basic** and add it to the **Project Administrators** group for the project the bot should access.
### Step 4: Register the application with Qodo
This step connects your Microsoft Entra ID application to your Qodo on-premises environment using the Qodo admin portal.
Open an incognito or private browser window and verify that no Microsoft account is currently signed in. This ensures you authenticate using the correct service account.
Sign in to Microsoft Entra ID using the dedicated service account created in Step 2.
In the same browser window, navigate to your Qodo admin portal and open the Azure DevOps configuration section.
Click **Edit** and provide the following details from the app registration in the Microsoft Azure portal:
* **OAuth Application ID** (Application (client) ID from the **Overview** tab)
* **OAuth Application Secret** (use the secret **value**, not the secret ID)
* **Entra Tenant ID** (Directory (tenant) ID from the **Overview** tab)
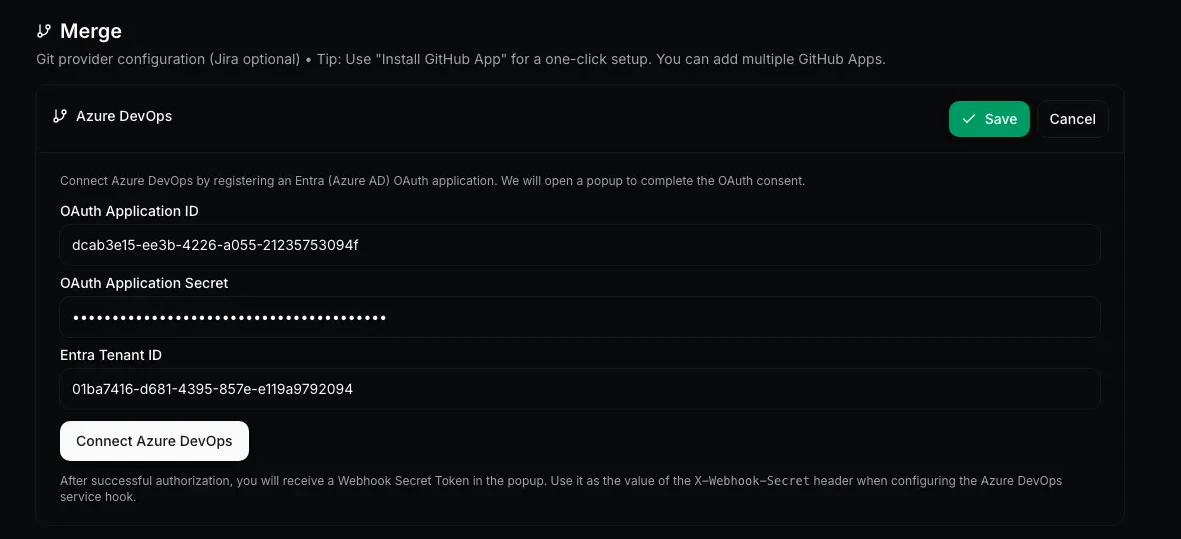 Click **Connect Azure DevOps** and then **Save**.
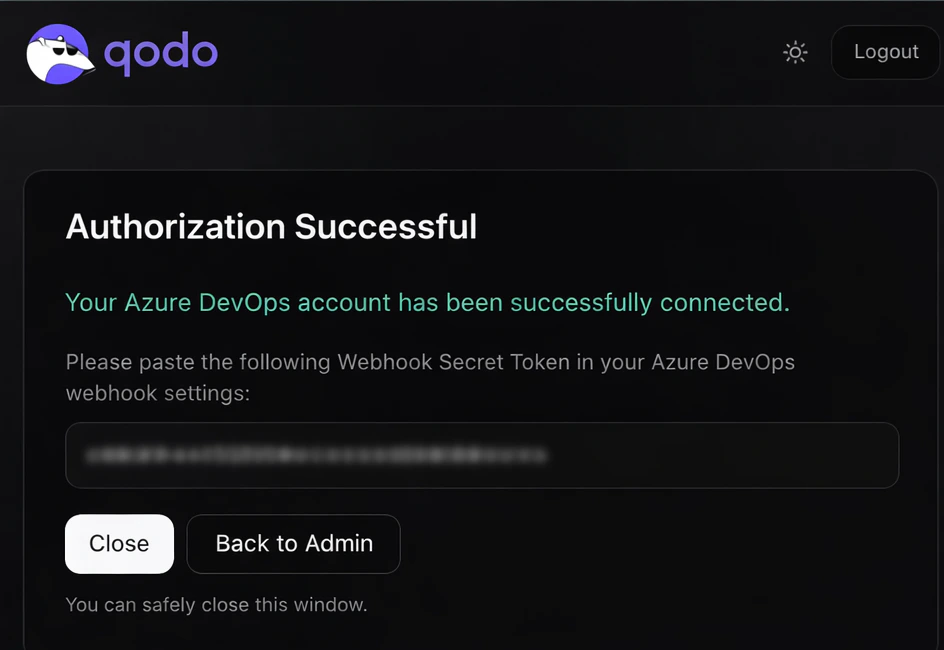 After successful registration, a new window will open displaying a **Webhook Secret Token**. Save this value. You will use it when configuring Azure DevOps webhooks in Step 5.
### Step 5: Set up webhooks
Webhooks enable two-way communication between Azure DevOps and Qodo.
Navigate to the Azure DevOps project where you want to install Qodo.
Open **Project settings → Service hooks**.
Create a new **Web Hook** subscription.
Configure the webhook to trigger on the following pull request events:
* PR Created
* PR Updated
* PR Commented
* PR Merged
Set the URL to your Qodo on-premises endpoint. For example: `https://qodo-merge..qodo.ai`
Add the following HTTP header:
```
X-Webhook-Secret:
```
Click **Test** to verify that the webhook endpoint is reachable and correctly configured.
Click **Finish** to create the webhook.
## Verify the installation
Open a new pull request in the configured Azure DevOps project and confirm that Qodo is triggered automatically.
Add a comment using one of the supported commands:
* `/agentic_describe`
* `/agentic_review`
Qodo should respond with a review or PR summary directly on the pull request.
## Next steps
[Using Qodo in PRs](/code-review/get-started/use-qodo-in-prs): Get the most out of Qodo.
After successful registration, a new window will open displaying a **Webhook Secret Token**. Save this value. You will use it when configuring Azure DevOps webhooks in Step 5.
### Step 5: Set up webhooks
Webhooks enable two-way communication between Azure DevOps and Qodo.
Navigate to the Azure DevOps project where you want to install Qodo.
Open **Project settings → Service hooks**.
Create a new **Web Hook** subscription.
Configure the webhook to trigger on the following pull request events:
* PR Created
* PR Updated
* PR Commented
* PR Merged
Set the URL to your Qodo on-premises endpoint. For example: `https://qodo-merge..qodo.ai`
Add the following HTTP header:
```
X-Webhook-Secret:
```
Click **Test** to verify that the webhook endpoint is reachable and correctly configured.
Click **Finish** to create the webhook.
## Verify the installation
Open a new pull request in the configured Azure DevOps project and confirm that Qodo is triggered automatically.
Add a comment using one of the supported commands:
* `/agentic_describe`
* `/agentic_review`
Qodo should respond with a review or PR summary directly on the pull request.
## Next steps
[Using Qodo in PRs](/code-review/get-started/use-qodo-in-prs): Get the most out of Qodo.