> ## Documentation Index
> Fetch the complete documentation index at: https://docs.qodo.ai/llms.txt
> Use this file to discover all available pages before exploring further.
# Install Qodo on Bitbucket Cloud
> Multi-tenant and single-tenant Bitbucket Cloud install guide for Qodo automated code review.
* Supported from Qodo 2.2.1.
* Available for both single-tenant and multi-tenant Qodo environments.
* Not sure which deployment model you need? See [Install Qodo in your Git provider](/code-review/get-started/installation) for a full comparison, or [check your deployment type](/deployment-models#check-your-deployment-type).
Qodo works natively with Bitbucket Cloud, using a Qodo Bitbucket account to post code review comments on pull requests. It relies on Bitbucket webhooks and native pull request workflows to deliver automated insights.
You can configure Qodo for selected repositories or across your entire Bitbucket workspace. Configuration typically takes around 5 minutes.
Once installed, Qodo automatically processes pull requests and delivers actionable insights, such as code reviews, descriptions, and improvement suggestions, directly within your Bitbucket workflow.
## Prerequisites
Before you begin, ensure you have:
* Access to your Qodo portal.
* A Qodo environment set up for Bitbucket Cloud. If you're unsure of your environment type, contact your Qodo Account Manager.
* System administrator access to your Bitbucket workspace.
* A dedicated email address to use for the Qodo Bitbucket account (for example, `qodo@yourcompany.com`). The account is created during the installation wizard.
## Access the Bitbucket integration
Log in to your [Qodo portal](https://app.qodo.ai/signin).
Start the wizard in one of the following ways:
Navigate to **Integrations** and click **Add installation** on the **Bitbucket** card.
On the homepage, in the top right-hand side, click the **+** button next to Git providers. On the selection page, choose **Bitbucket**.
## Install Qodo on Bitbucket Cloud
You must have system administrative access in your Bitbucket workspace to complete the setup.
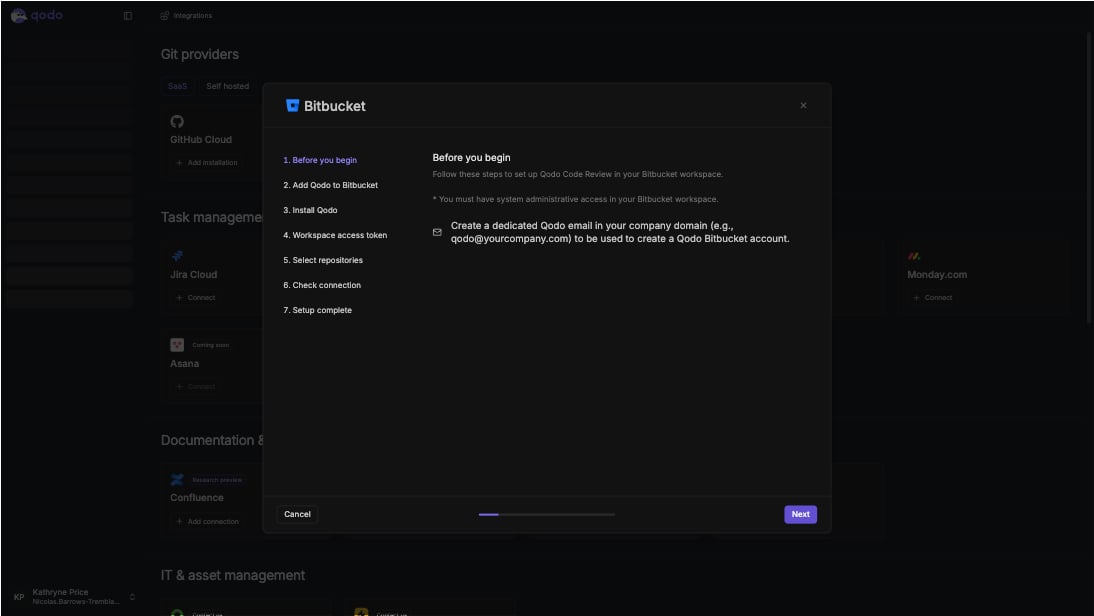
1. Create a dedicated Qodo email in your company domain (e.g., `qodo@yourcompany.com`) to be used to create a Qodo Bitbucket account.
2. Click **Next** to proceed.
 Using the email you just created, add Qodo as a user in your Bitbucket workspace.
* Click **Download Qodo logo for avatar** and save it for use in sub-step 3.
Using the email you just created, add Qodo as a user in your Bitbucket workspace.
* Click **Download Qodo logo for avatar** and save it for use in sub-step 3.
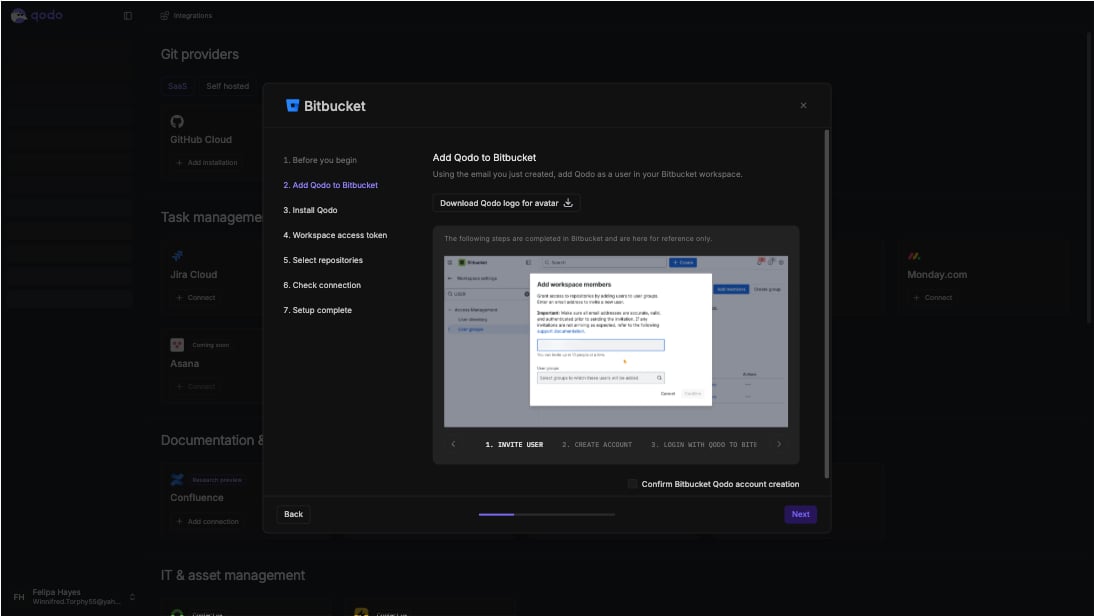 Complete the following steps in Bitbucket:
Go to **Workspace settings → User groups**, open **Add workspace members**, and enter the Qodo email address.
Accept the invitation email to create the Qodo Bitbucket account.
Log in to Bitbucket using the Qodo account credentials.
Back in the wizard, select the **Confirm Bitbucket Qodo account creation** checkbox, then click **Next**.
Using the Qodo Bitbucket account you just created, install the Qodo app.
Complete the following steps in Bitbucket:
Go to **Workspace settings → User groups**, open **Add workspace members**, and enter the Qodo email address.
Accept the invitation email to create the Qodo Bitbucket account.
Log in to Bitbucket using the Qodo account credentials.
Back in the wizard, select the **Confirm Bitbucket Qodo account creation** checkbox, then click **Next**.
Using the Qodo Bitbucket account you just created, install the Qodo app.
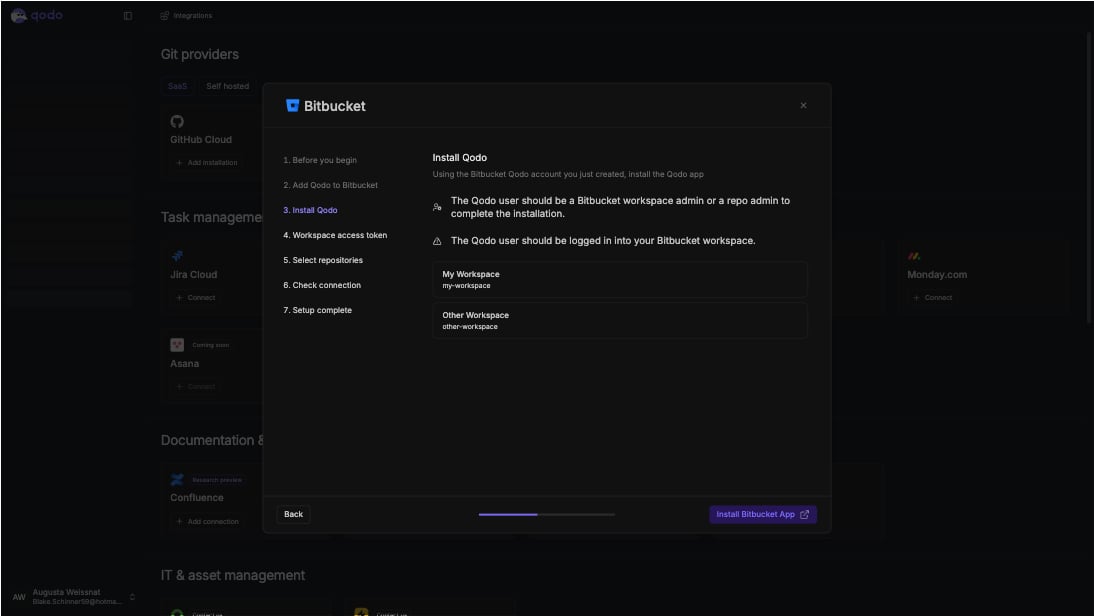 Requirements
* The Qodo user must be a Bitbucket workspace admin or repo admin to complete the installation.
* The Qodo user must be logged in to your Bitbucket workspace.
If Qodo has access to more than one workspace, select the workspace to install Qodo on.
* Click **Install Bitbucket App** to proceed.
This step is optional. Skip it to keep using the previously authorized Bitbucket account. If a workspace access token is already saved and this field is left empty, it's replaced with the authorized account.
If you're using Bitbucket Cloud Premium, you can add a workspace access token instead. It's recommended for workspaces with many repositories: it gives Qodo higher API limits and reduces the chance of Bitbucket rate limiting or blocking requests.
Requirements
* The Qodo user must be a Bitbucket workspace admin or repo admin to complete the installation.
* The Qodo user must be logged in to your Bitbucket workspace.
If Qodo has access to more than one workspace, select the workspace to install Qodo on.
* Click **Install Bitbucket App** to proceed.
This step is optional. Skip it to keep using the previously authorized Bitbucket account. If a workspace access token is already saved and this field is left empty, it's replaced with the authorized account.
If you're using Bitbucket Cloud Premium, you can add a workspace access token instead. It's recommended for workspaces with many repositories: it gives Qodo higher API limits and reduces the chance of Bitbucket rate limiting or blocking requests.
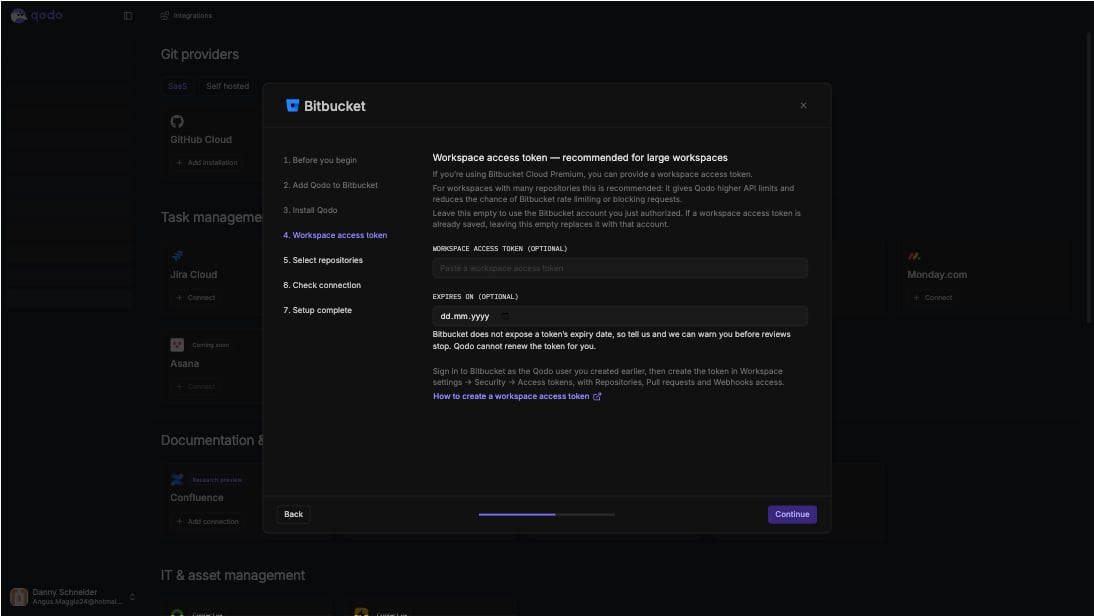 Create a workspace access token in Bitbucket.
1. Sign in as the Qodo user created during installation.
2. Go to **Workspace settings → Security → Access tokens**.
3. Create a token with **Repositories**, **Pull requests**, and **Webhooks** access.
See [How to create a workspace access token](https://support.atlassian.com/bitbucket-cloud/docs/create-a-workspace-access-token/).
Then, back in the wizard, fill in:
* **Workspace access token** (optional): Paste the token you created.
* **Expires on** (optional): Add the token's expiry date. Bitbucket doesn't expose this date. Enter it here to get a warning before reviews stop. Qodo can't renew the token automatically.
* Click **Continue** to proceed.
Select the repositories for Qodo to review.
Create a workspace access token in Bitbucket.
1. Sign in as the Qodo user created during installation.
2. Go to **Workspace settings → Security → Access tokens**.
3. Create a token with **Repositories**, **Pull requests**, and **Webhooks** access.
See [How to create a workspace access token](https://support.atlassian.com/bitbucket-cloud/docs/create-a-workspace-access-token/).
Then, back in the wizard, fill in:
* **Workspace access token** (optional): Paste the token you created.
* **Expires on** (optional): Add the token's expiry date. Bitbucket doesn't expose this date. Enter it here to get a warning before reviews stop. Qodo can't renew the token automatically.
* Click **Continue** to proceed.
Select the repositories for Qodo to review.
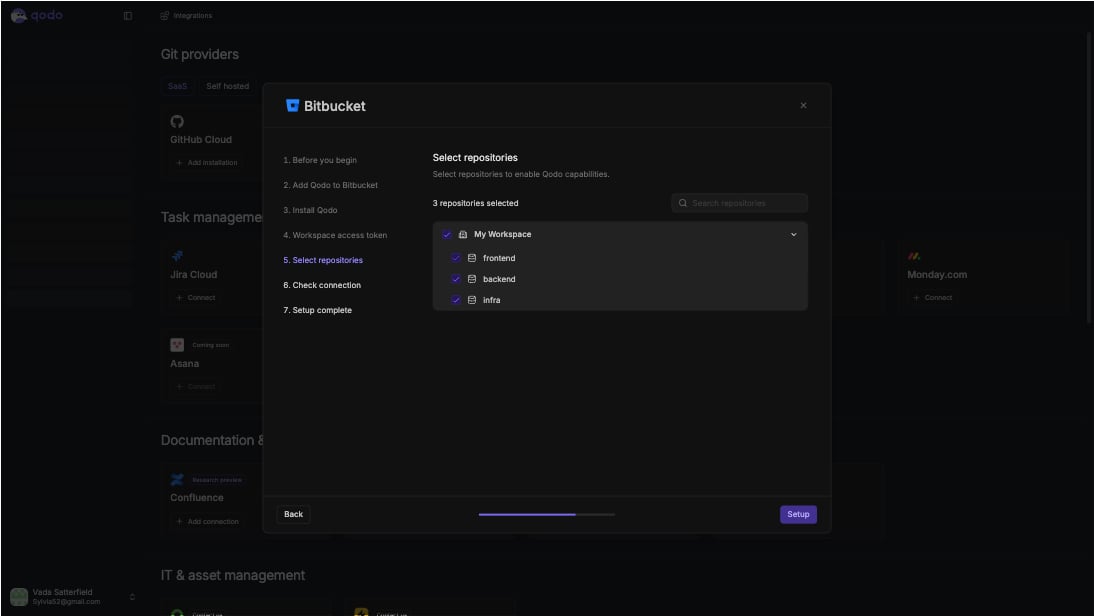 Use the search bar to find specific repositories, or browse by workspace and project. You can select individual repositories or an entire workspace.
* Click **Setup** to continue.
You can always add more repositories later by returning to this step.
Qodo verifies the connection to each repository selected in the previous step.
Use the search bar to find specific repositories, or browse by workspace and project. You can select individual repositories or an entire workspace.
* Click **Setup** to continue.
You can always add more repositories later by returning to this step.
Qodo verifies the connection to each repository selected in the previous step.
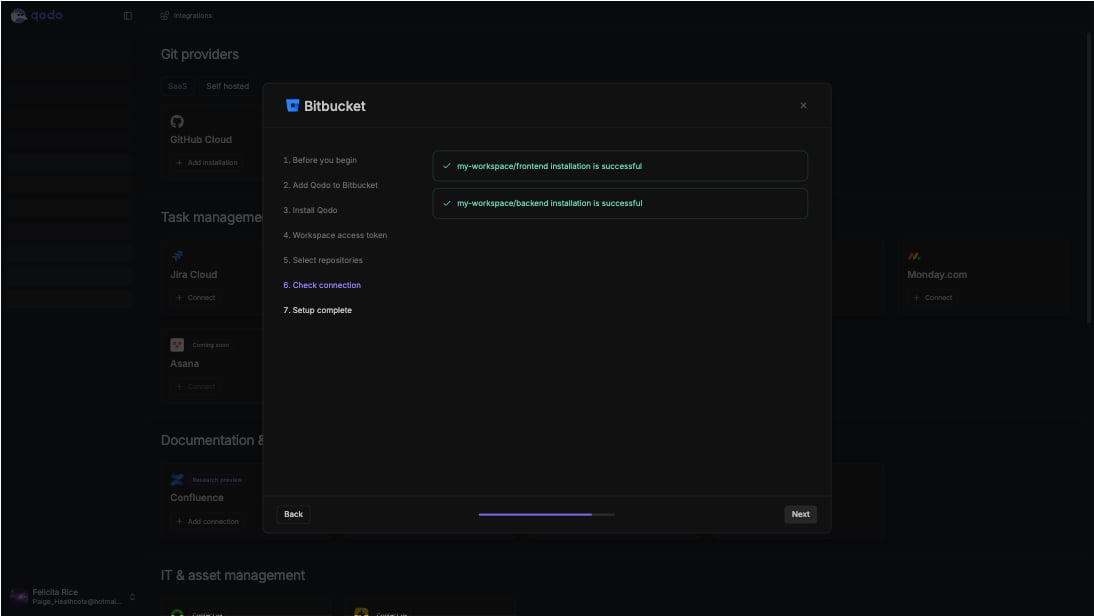 Each selected repository is listed with its installation status.
* Click **Next** to continue.
Qodo has been installed on your Bitbucket workspace. Repositories are fully connected and active within a few minutes.
Each selected repository is listed with its installation status.
* Click **Next** to continue.
Qodo has been installed on your Bitbucket workspace. Repositories are fully connected and active within a few minutes.
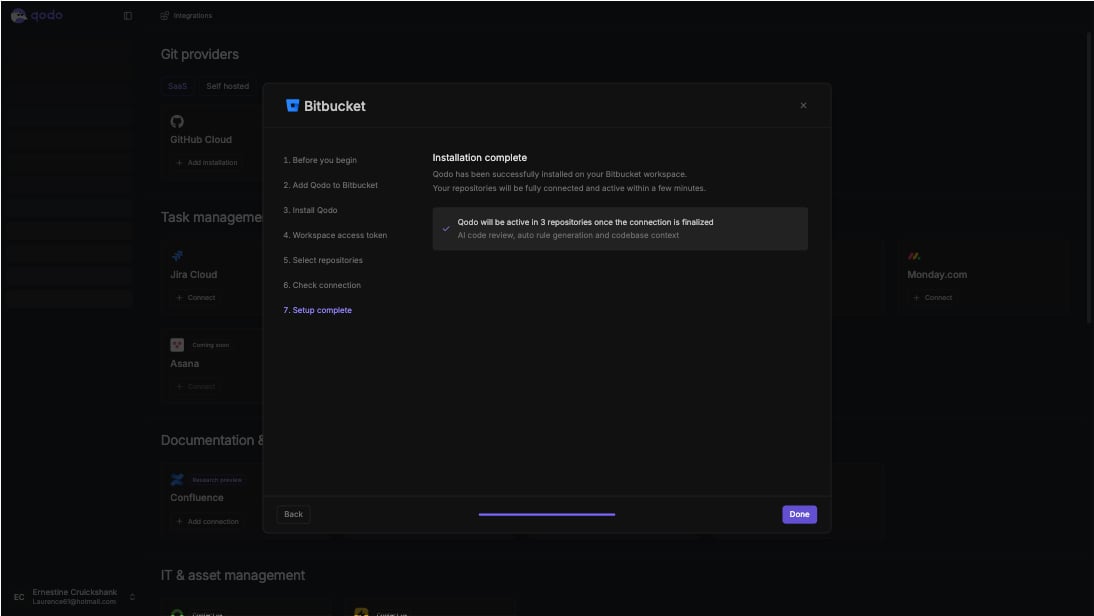 The confirmation screen shows the number of repositories that will be active once the connection is finalized, and confirms that AI code review, auto rule generation, and codebase context are included.
* Click **Done** to finish.
Qodo is set up for the selected repositories and becomes active once the connection is finalized. To add repositories, return to this wizard at any time and run a new installation with the updated scope. Repositories that already have Qodo installed are not available for selection. To reduce scope, remove the installation and create a new one.
## Verify the installation
Open a new pull request in one of the connected repositories and confirm Qodo is triggered automatically.
Add a comment using one of the supported commands:
* `/agentic_describe`
* `/agentic_review`
Qodo should respond with a review or PR summary directly on the pull request.
## Next steps
* [Repositories page](/governance/repositories): Enable or disable Qodo on individual repositories within your current scope.
* [Trigger a code review](/code-review/use-qodo-in-prs): Run a review automatically or on demand.
The confirmation screen shows the number of repositories that will be active once the connection is finalized, and confirms that AI code review, auto rule generation, and codebase context are included.
* Click **Done** to finish.
Qodo is set up for the selected repositories and becomes active once the connection is finalized. To add repositories, return to this wizard at any time and run a new installation with the updated scope. Repositories that already have Qodo installed are not available for selection. To reduce scope, remove the installation and create a new one.
## Verify the installation
Open a new pull request in one of the connected repositories and confirm Qodo is triggered automatically.
Add a comment using one of the supported commands:
* `/agentic_describe`
* `/agentic_review`
Qodo should respond with a review or PR summary directly on the pull request.
## Next steps
* [Repositories page](/governance/repositories): Enable or disable Qodo on individual repositories within your current scope.
* [Trigger a code review](/code-review/use-qodo-in-prs): Run a review automatically or on demand.