> ## Documentation Index
> Fetch the complete documentation index at: https://docs.qodo.ai/llms.txt
> Use this file to discover all available pages before exploring further.
# Install Qodo on GitLab
> Install guide for Qodo automated code review on GitLab, using the guided installation wizard.
* This wizard can be used for Qodo multi-tenant and single-tenant, on both GitLab Cloud and GitLab Server.
* Not sure which deployment model you need? See [Install Qodo in your Git provider](/install-and-configure/install) for a full comparison, or [check your deployment type](/deployment-models#check-your-deployment-type).
Qodo works directly with GitLab, using a dedicated GitLab account to post code review comments on merge requests. Qodo creates this account automatically using a personal access token you provide during setup, then discards the token. It relies on native merge request workflows to deliver automated insights.
You can configure Qodo for selected repositories or across your entire GitLab group. Configuration typically takes around 5–10 minutes.
Once installed, Qodo automatically processes merge requests and delivers actionable insights, such as code reviews, descriptions, and improvement suggestions, directly within your GitLab workflow.
## Prerequisites
Before you begin, ensure you have:
* Access to your Qodo portal.
* GitLab group Owner access (GitLab Cloud) or instance Admin access (GitLab Server), to sign in and generate the personal access token during setup.
## Access the GitLab integration
Log in to your Qodo portal.
From the left-hand navigation menu, select **Integrations**.
Locate the relevant card and click **Add installation** to launch the installation wizard:
* If you are using **GitLab Cloud**, select the **SaaS** tab and locate the **GitLab** card.
* If you are using **GitLab Server**, select the **Self-Hosted** tab and locate the **GitLab** card.
## Install Qodo on GitLab
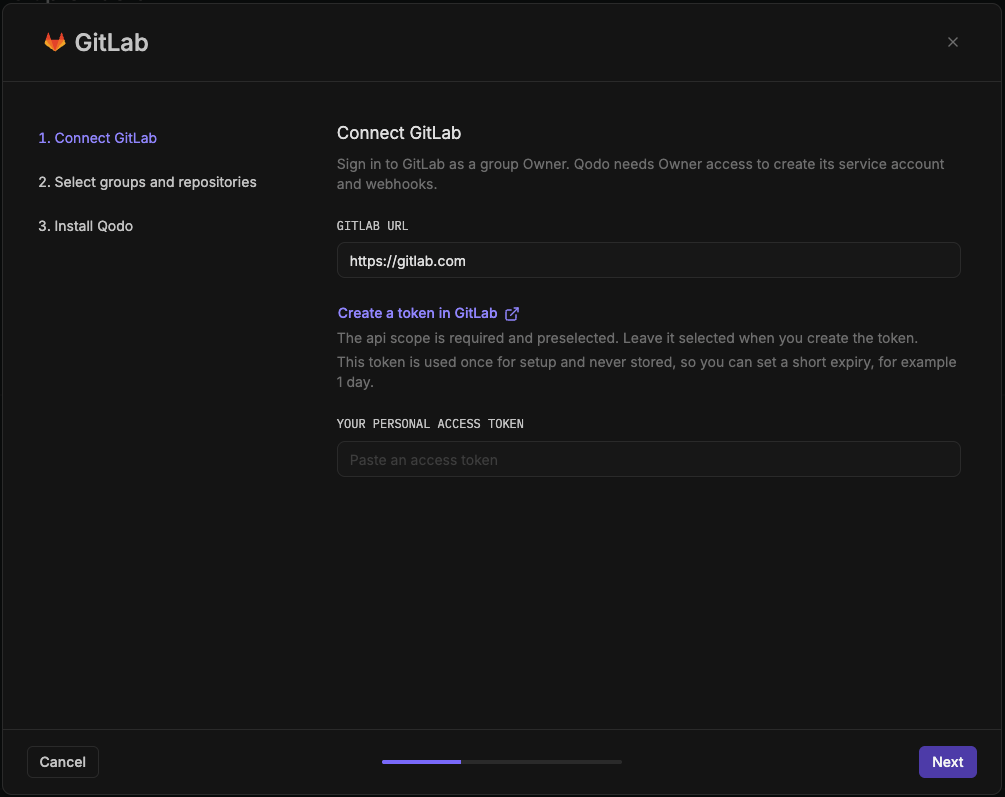 Enter your **GitLab URL**:
* On **GitLab Cloud**, this defaults to `https://gitlab.com`. Sign in as a group Owner.
* On **GitLab Server**, enter your instance URL (for example, `https://gitlab.example.com`). Sign in as an instance Admin.
Click **Create a token in GitLab** to open your GitLab instance's access token settings directly.
* On **GitLab Cloud**, this is the only link shown.
* On **GitLab Server**, once you enter a non-`gitlab.com` URL, a second link also appears: **Create a token in GitLab 16.6 or earlier**. Use it only if your instance is on GitLab 16.6 or earlier; otherwise, use **Create a token in GitLab**.
The `api` scope is required and preselected. Leave it selected when you create the token.
This token is used once for setup and never stored, allowing a short expiry, e.g., 1 day.
Paste the personal access token and click **Next**.
Enter your **GitLab URL**:
* On **GitLab Cloud**, this defaults to `https://gitlab.com`. Sign in as a group Owner.
* On **GitLab Server**, enter your instance URL (for example, `https://gitlab.example.com`). Sign in as an instance Admin.
Click **Create a token in GitLab** to open your GitLab instance's access token settings directly.
* On **GitLab Cloud**, this is the only link shown.
* On **GitLab Server**, once you enter a non-`gitlab.com` URL, a second link also appears: **Create a token in GitLab 16.6 or earlier**. Use it only if your instance is on GitLab 16.6 or earlier; otherwise, use **Create a token in GitLab**.
The `api` scope is required and preselected. Leave it selected when you create the token.
This token is used once for setup and never stored, allowing a short expiry, e.g., 1 day.
Paste the personal access token and click **Next**.
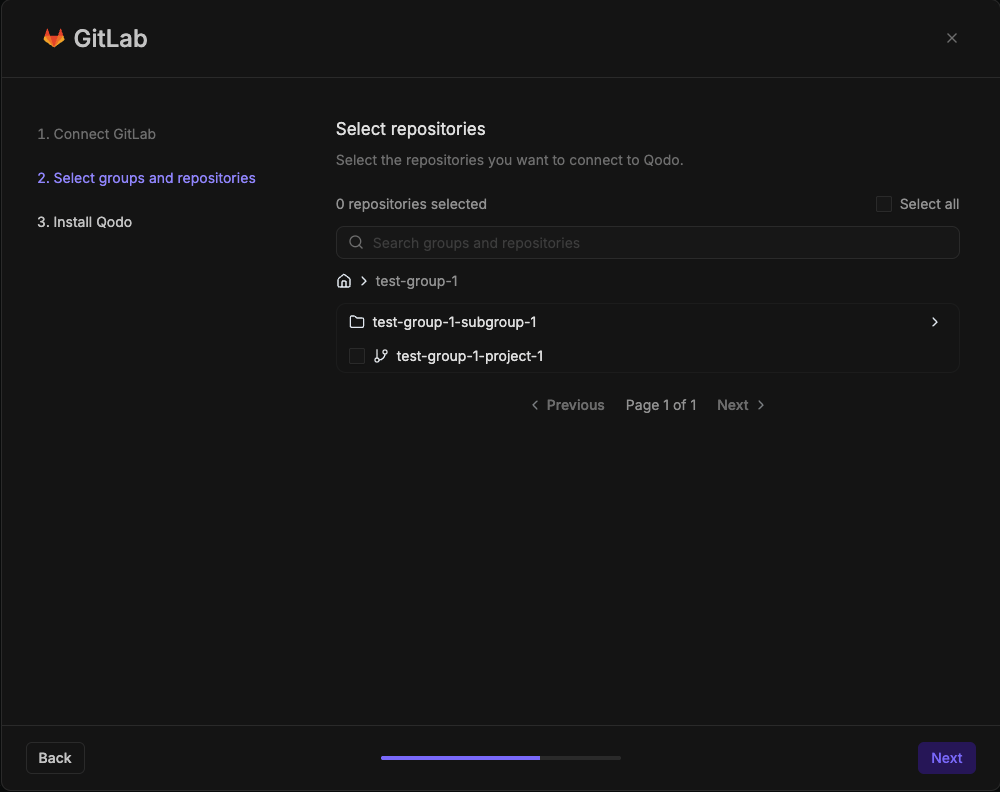 Find and select what to connect:
* Use the search bar to find a specific group or repository, or browse the list of top-level groups you have access to.
* Select a group to connect every repository within it, or drill into a group to select individual repositories.
* Select **Select all** to connect everything you have access to in one step.
This step appears as "Select repositories" on GitLab Community Edition and GitLab free-tier instances, which don't support group hooks, or as "Select groups and repositories" on GitLab tiers that do. When group hooks are available, selecting a group creates a group hook; otherwise, selecting a repository creates a repository hook.
Click **Next**.
Find and select what to connect:
* Use the search bar to find a specific group or repository, or browse the list of top-level groups you have access to.
* Select a group to connect every repository within it, or drill into a group to select individual repositories.
* Select **Select all** to connect everything you have access to in one step.
This step appears as "Select repositories" on GitLab Community Edition and GitLab free-tier instances, which don't support group hooks, or as "Select groups and repositories" on GitLab tiers that do. When group hooks are available, selecting a group creates a group hook; otherwise, selecting a repository creates a repository hook.
Click **Next**.
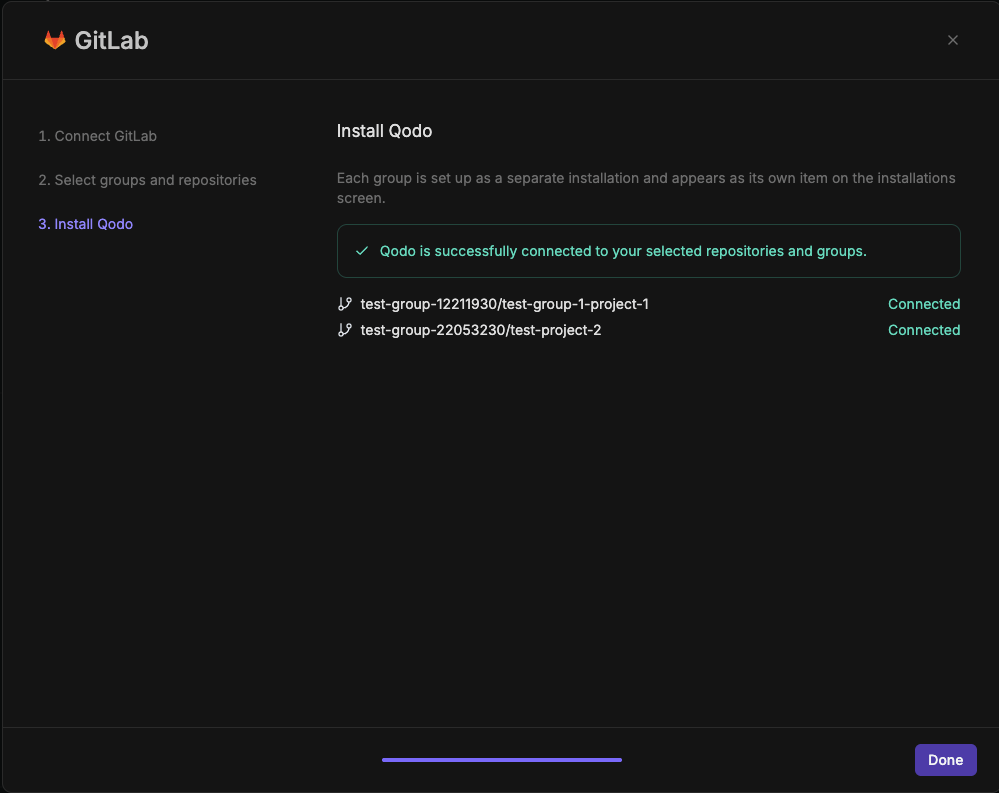 Qodo confirms it's connected to your selected repositories and groups.
* Each one shows its status: **Already connected** from a previous installation, or **Connected** if newly connected.
* On GitLab Cloud, installing across multiple top-level groups sets up each group as a separate installation, appearing as its own item on the [Installations tab](/governance/repositories/installations).
* Click **Done**.
Qodo is now active on the repositories in the groups you selected. To connect more repositories under an existing installation, use [Manage the repositories in an installation](/governance/repositories/installations#manage-the-repositories-in-an-installation) on the Repositories page. To connect a different group, return to this wizard.
## Verify the installation
Open a new merge request in one of the connected repositories and confirm Qodo is triggered automatically.
Add a comment using one of the supported commands:
* `/agentic_describe`
* `/agentic_review`
Qodo should respond with a review or MR summary directly on the merge request.
## Next steps
* [Repositories page](/governance/repositories): Manage which repositories Qodo is active on, or remove an installation.
* [Trigger a code review](/code-review/use-qodo-in-prs): Run a review automatically or on demand.
* [Migration guide](/install-and-configure/install/gitlab/migration): Migrate an existing Qodo installation.
Qodo confirms it's connected to your selected repositories and groups.
* Each one shows its status: **Already connected** from a previous installation, or **Connected** if newly connected.
* On GitLab Cloud, installing across multiple top-level groups sets up each group as a separate installation, appearing as its own item on the [Installations tab](/governance/repositories/installations).
* Click **Done**.
Qodo is now active on the repositories in the groups you selected. To connect more repositories under an existing installation, use [Manage the repositories in an installation](/governance/repositories/installations#manage-the-repositories-in-an-installation) on the Repositories page. To connect a different group, return to this wizard.
## Verify the installation
Open a new merge request in one of the connected repositories and confirm Qodo is triggered automatically.
Add a comment using one of the supported commands:
* `/agentic_describe`
* `/agentic_review`
Qodo should respond with a review or MR summary directly on the merge request.
## Next steps
* [Repositories page](/governance/repositories): Manage which repositories Qodo is active on, or remove an installation.
* [Trigger a code review](/code-review/use-qodo-in-prs): Run a review automatically or on demand.
* [Migration guide](/install-and-configure/install/gitlab/migration): Migrate an existing Qodo installation.